

Azure Entra ID
This guide will walk you through setting up automatic user provisioning between Azure Entra ID (formerly Azure Active Directory) and Stacksync.
Overview
By the end of this guide, you will have:
- ✅ SAML-based Single Sign-On configured
- ✅ Automatic user provisioning via SCIM
- ✅ Role-based access control
- ✅ Users automatically created/updated/deactivated in Stacksync
Estimated time: 30–45 minutes
Prerequisites
Before you begin, ensure you have:
- Azure Entra ID admin access with at least Cloud Application Administrator role
- Stacksync owner account
- Your company's email domain (e.g.,
acme.com) - List of users who should have access
Part 1: Create Enterprise Application in Azure
Step 1.1: Navigate to Enterprise Applications
- Sign in to the Azure Portal: https://portal.azure.com
- In the search bar at the top, type "Microsoft Entra ID" and select it
- In the left sidebar, click Enterprise applications
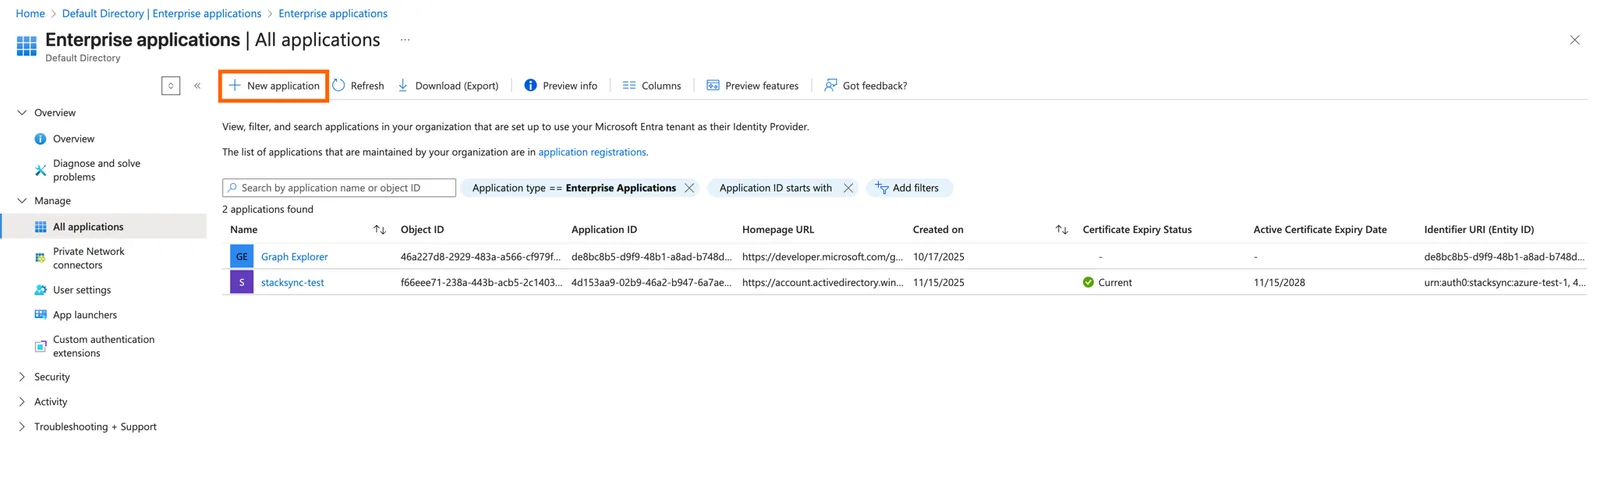
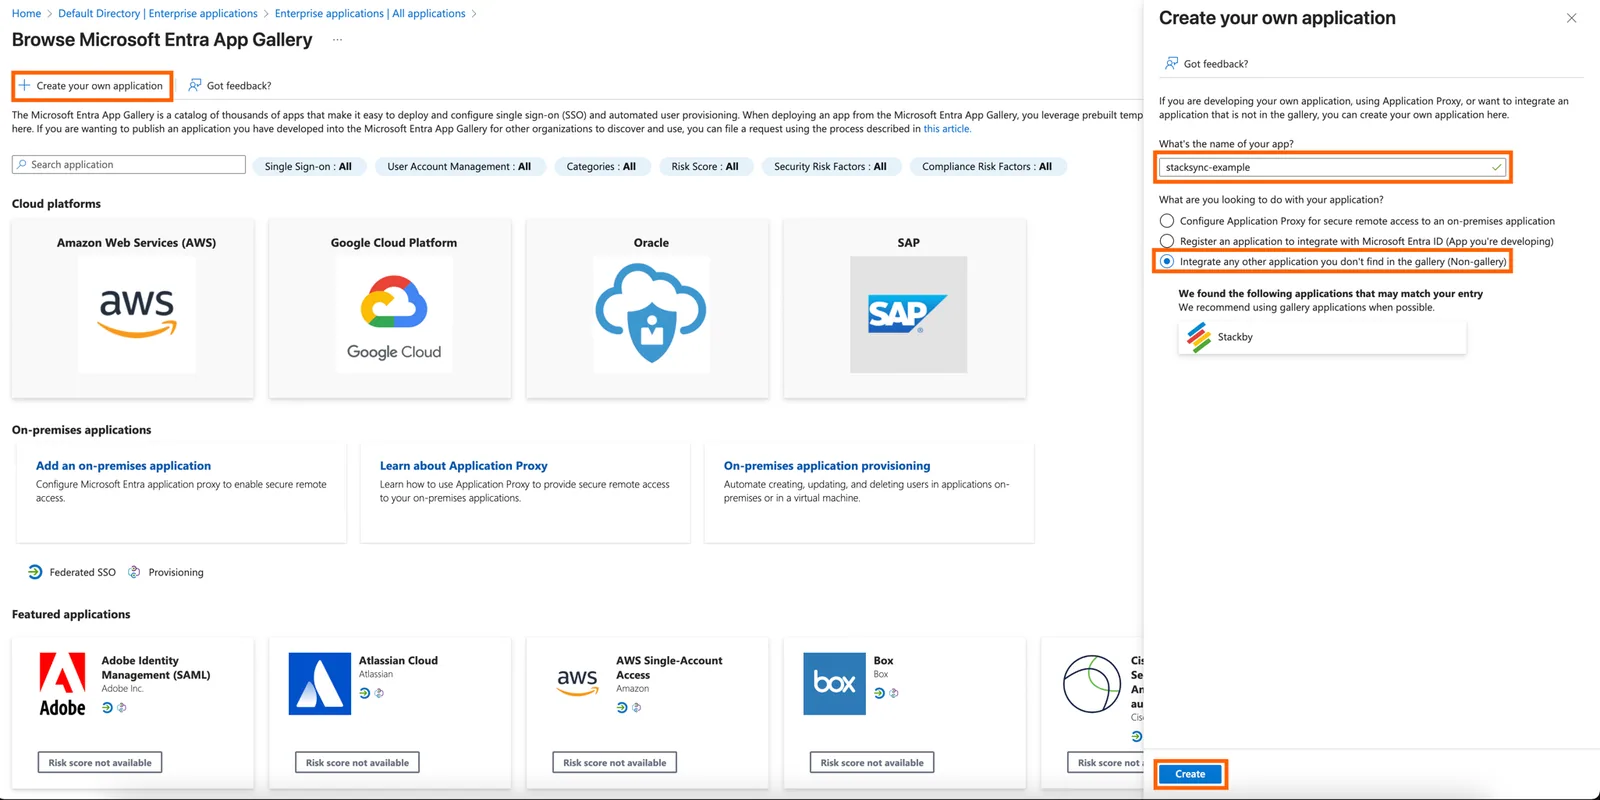
Step 1.2: Create New Application
- Click + New application (top left)
- Click + Create your own application
- Enter the application name: stacksync-example
- Select: "Integrate any other application you don't find in the gallery (non-gallery)"
- Click Create
Wait a few seconds for Azure to create the application.
Part 2: Configure SAML Single Sign-On
Step 2.1: Start SAML Setup
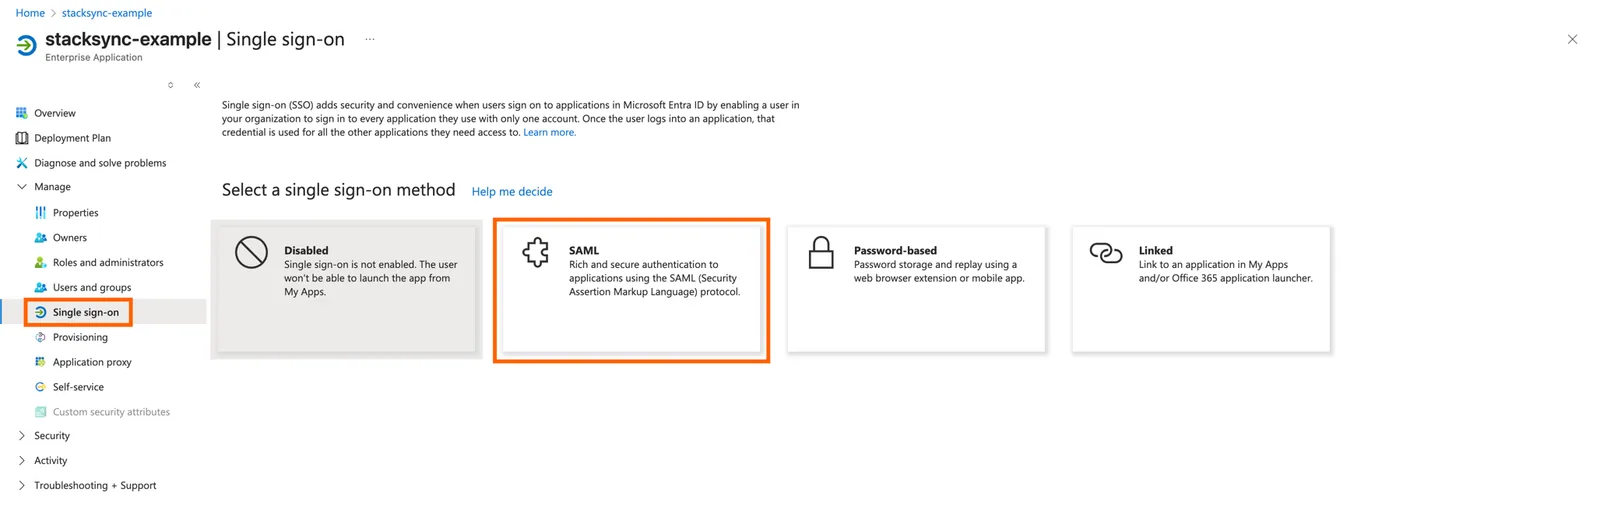
- In your stacksync-example enterprise application, click Single sign-on in the left sidebar
- Click the SAML tile
Step 2.2: Download Azure Metadata
Before configuring anything, download your Azure metadata file:
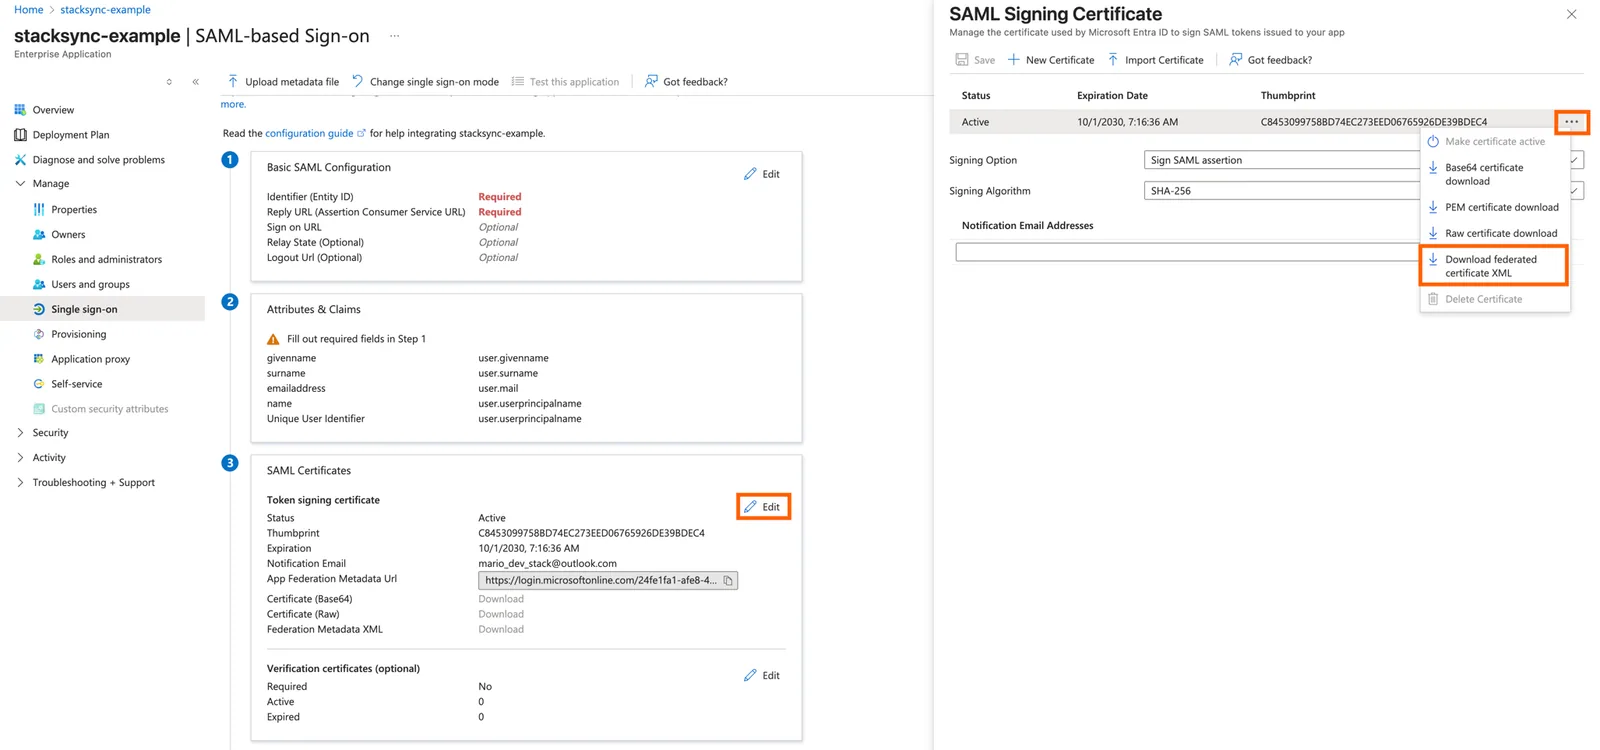
- Scroll down to section "3. SAML Certificates"
- Under "Token signing certificate", click Edit (pencil icon on the right)
- Click the three dots menu (...) next to the Active certificate
- Select "Download federated certificate XML" from the dropdown menu
- Save the file (e.g.,
AzureMetadata.xml)
Step 2.3: Configure SSO in your workspace
The SSO configuration should only be done once per company domain. All domains will be connected under the same SSO configuration.
- Navigate to your workspace settings
- Choose Azure AD (Entra ID) as your identity provider
- Upload the federated certificate XML file you downloaded from Azure in the step above
- You can choose Restrict login to SSO only for this domain. This ensures users with this domain can only log in via the SSO flow.
- Click Continue.
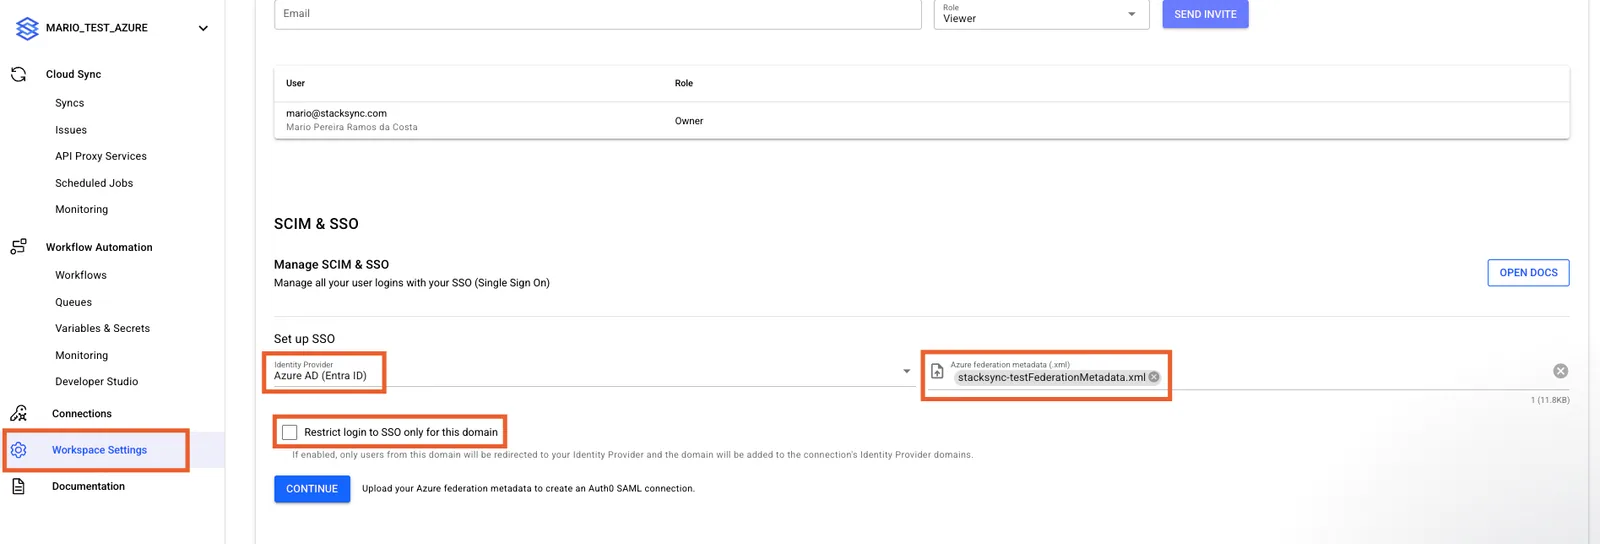
- You should now see a page with all the necessary info to continue the setup in Azure.

Step 2.4: Configure Basic SAML Settings
Once you have completed the SSO configuration in your workspace, you can continue with the setup in Azure:
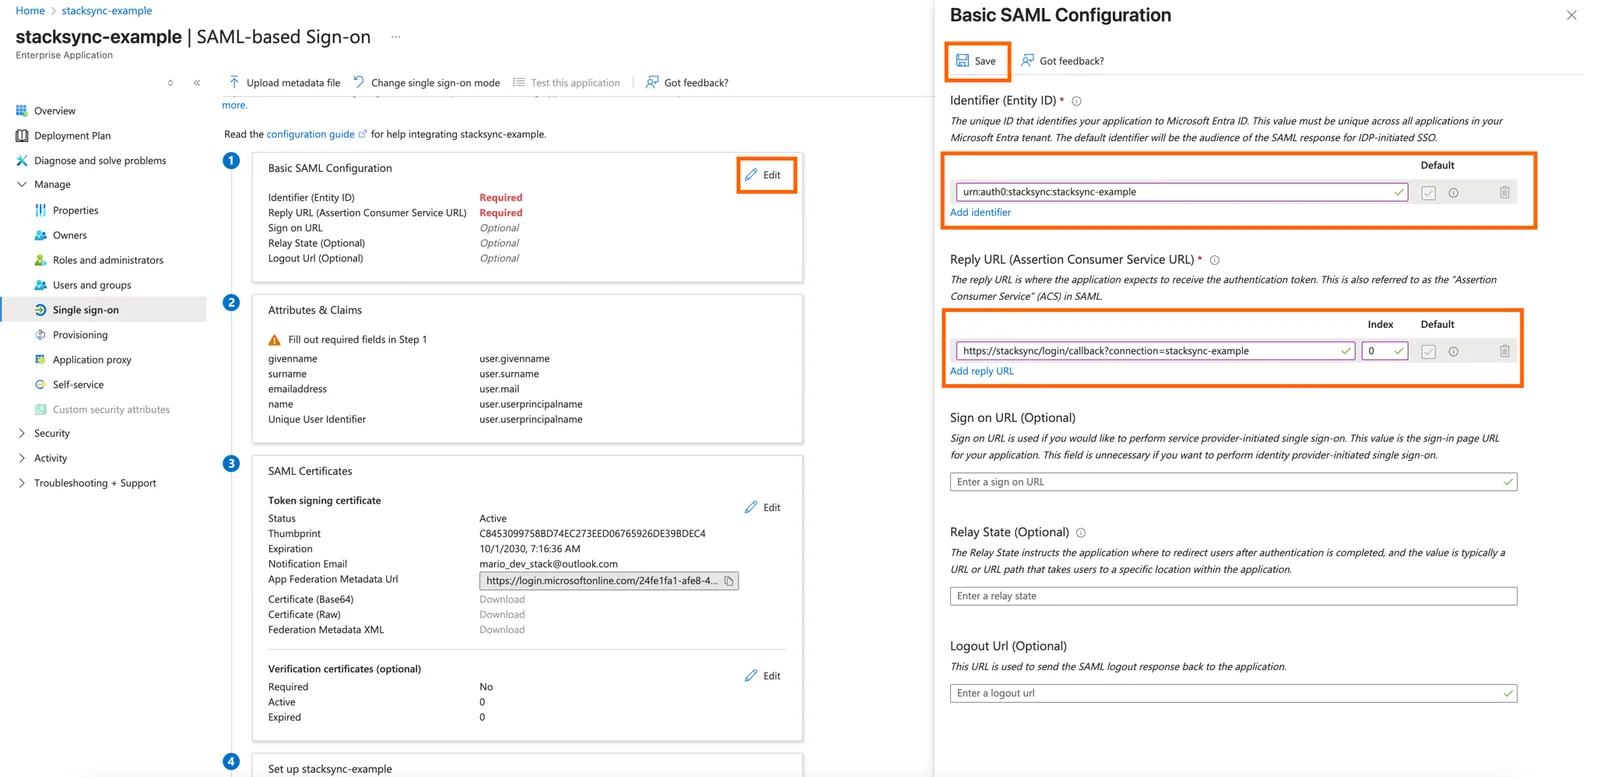
- Go back to your Azure SAML setup page
- Click Edit on section "1. Basic SAML Configuration"
- Fill in the values provided by Stacksync support:
Identifier (Entity ID):
urn:auth0:stacksync:companydomain-com-sso-azure-ad(Use the exact value from the above step)
Reply URL (Assertion Consumer Service URL):
https://auth.stacksync.com/login/callback?connection=companydomain-com-sso-azure-ad(Use the exact value from the above step)
Sign on URL (optional):
https://stacksync.com/login- Click Save
- Close the panel by clicking X
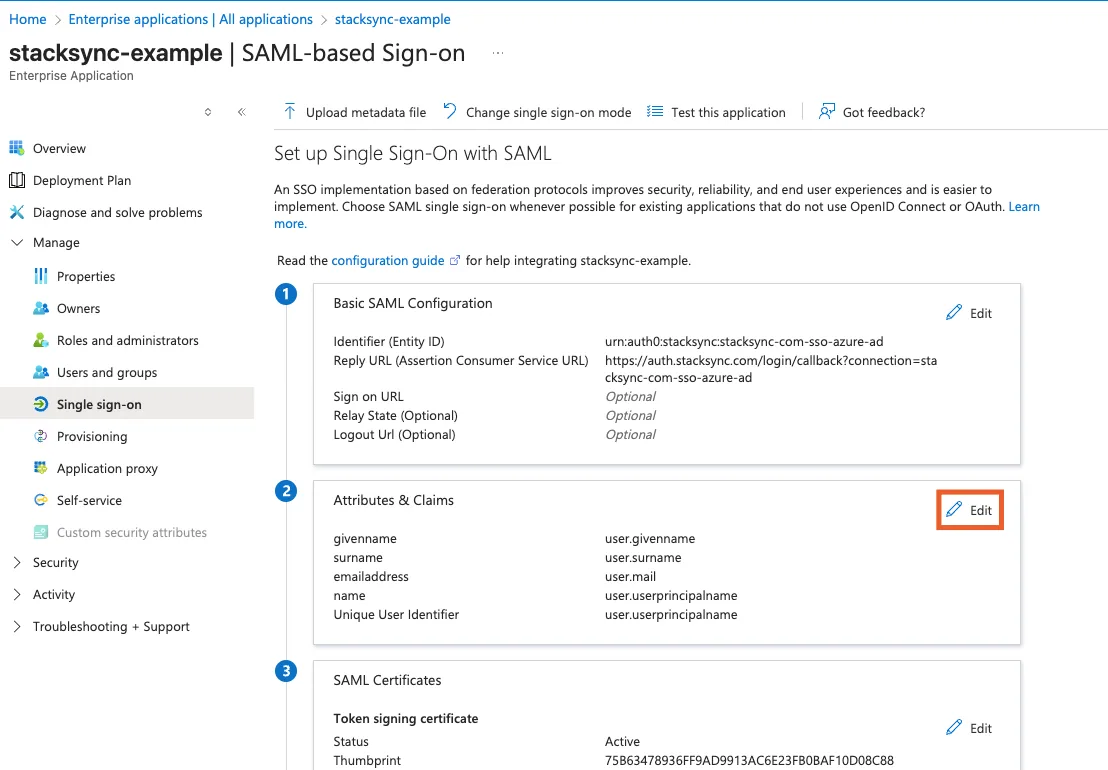
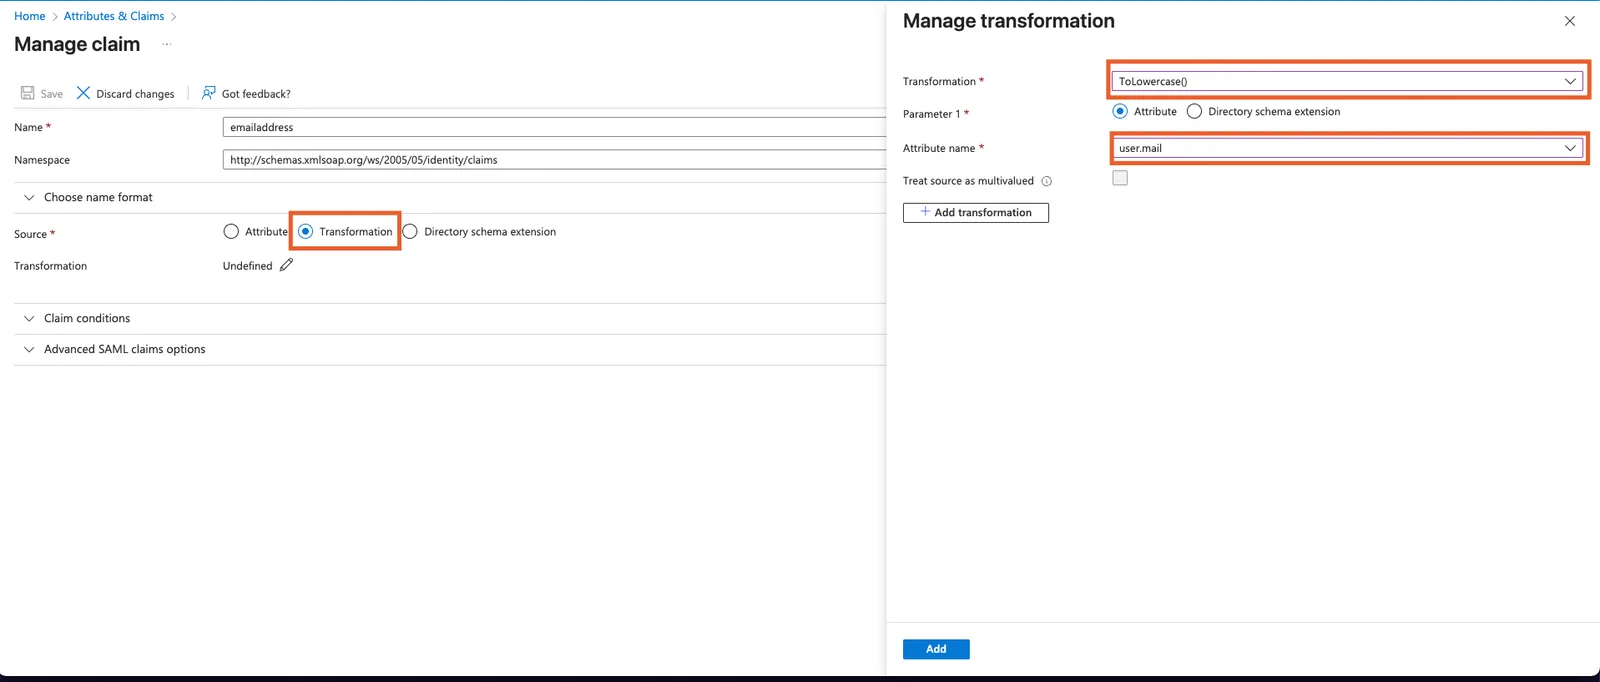
Step 2.5: Configure the email claim
This is needed because some emails could have uppercase letters, which can cause the SSO login to fail.
- Edit the Attributes & Claims section
- Click on the user.mail claim to start editing it
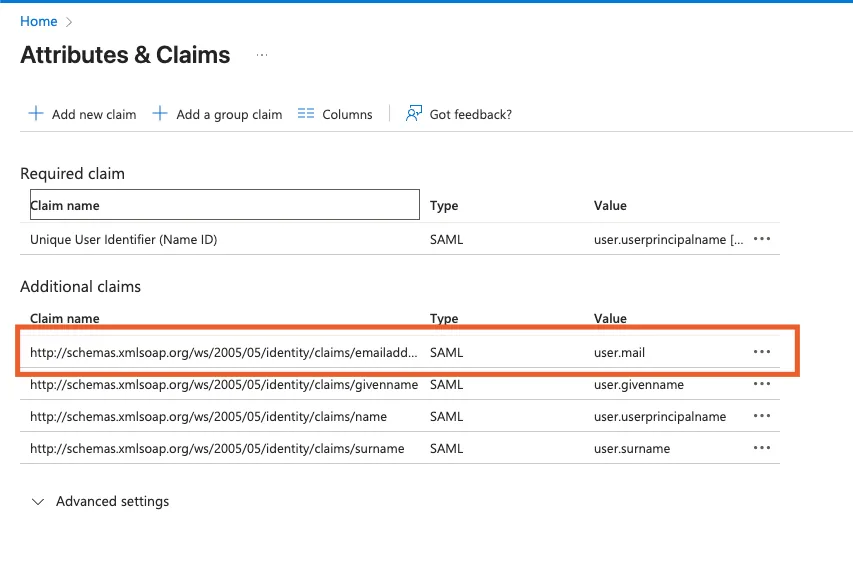
- Change the source to Transformation (this opens a side panel).
- In the Transformation dropdown, choose
ToLowercase(). - In the Attribute name dropdown, choose
user.mail. - Click Add, then click Save on the main page.
Part 3: Set Up Automatic User Provisioning (SCIM)
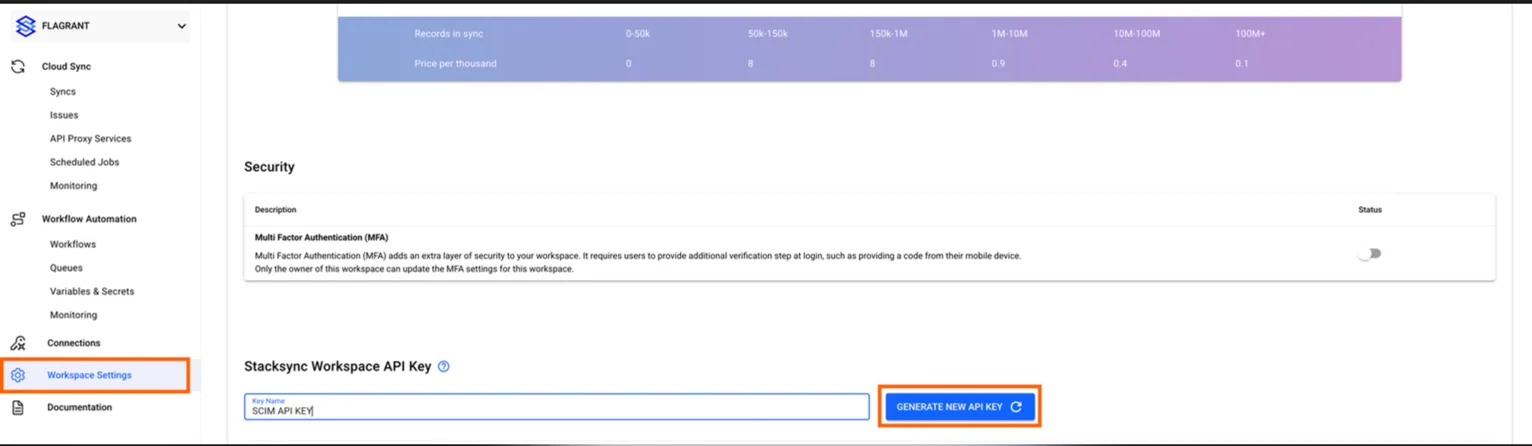
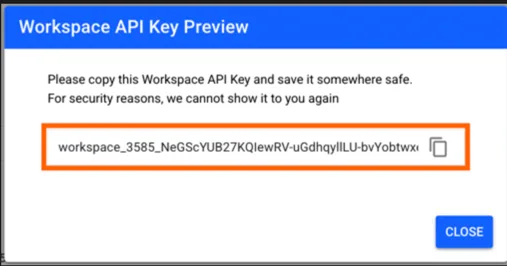
Step 3.1: Generate an API token for your workspace
- In your Stacksync workspace settings, scroll down to "Stacksync Workspace API Key"
- Create an API key for SCIM use.
Step 3.2: Enable Automatic Provisioning
- In your Stacksync enterprise application, click Provisioning in the left sidebar
- Click + New configuration (at the top).
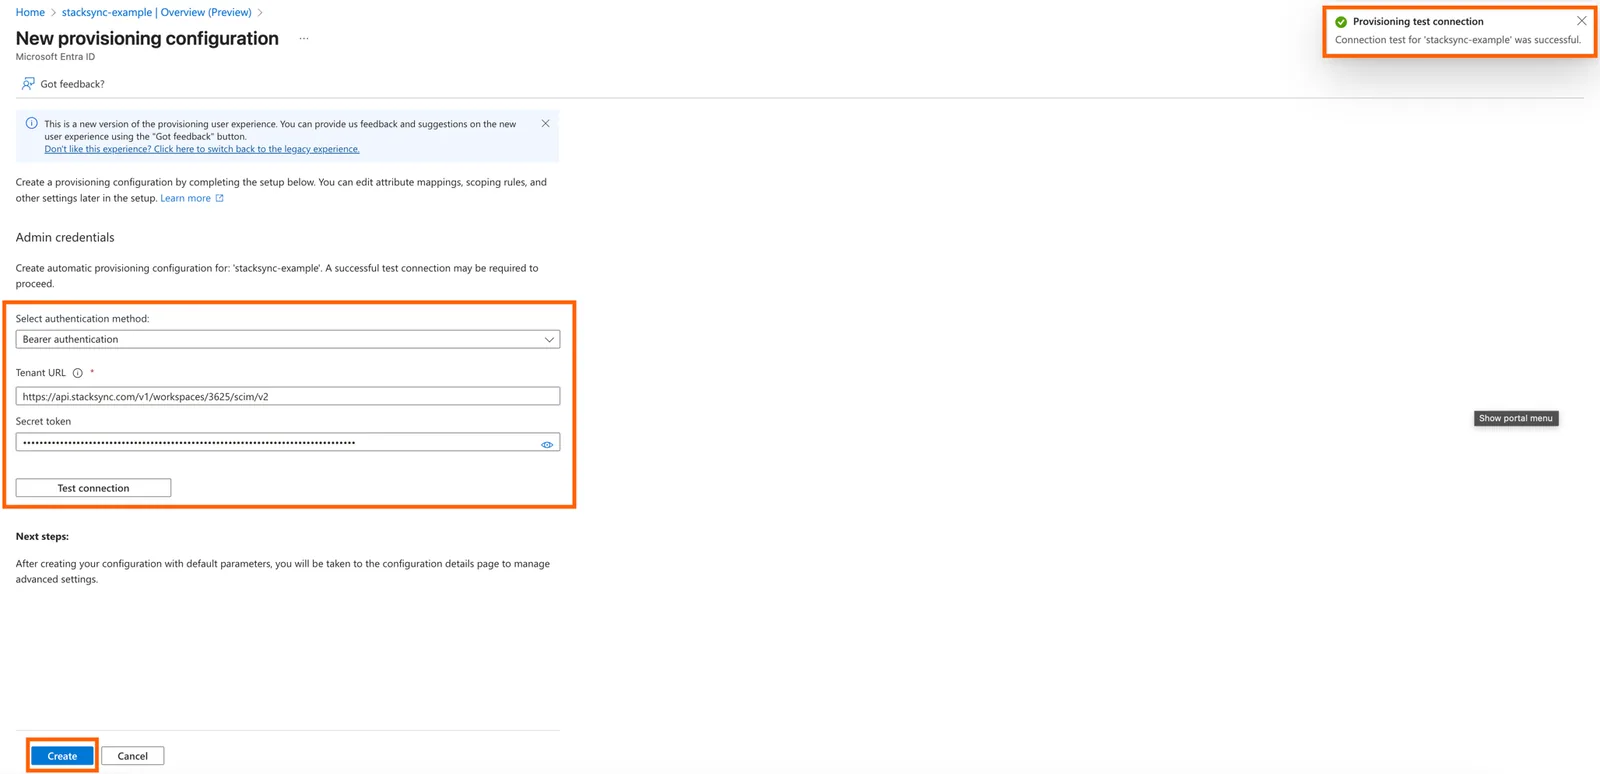
- On the "New provisioning configuration" page:
- Select authentication method: Bearer authentication (default)
- Tenant URL: Paste the URL provided by Stacksync support.
https://api.stacksync.com/v1/workspaces/[your-workspace-id]/scim/v2- Secret Token: Paste the token that you generated in your workspace
- Click Test connection
- You should see: ✅ "Connection test for 'stacksync-example' was successful"
- Click Create (bottom left)
Part 4: Create App Roles for Stacksync
App roles define which permission level users have in Stacksync (viewer or editor).
Step 4.1: Navigate to App Registrations
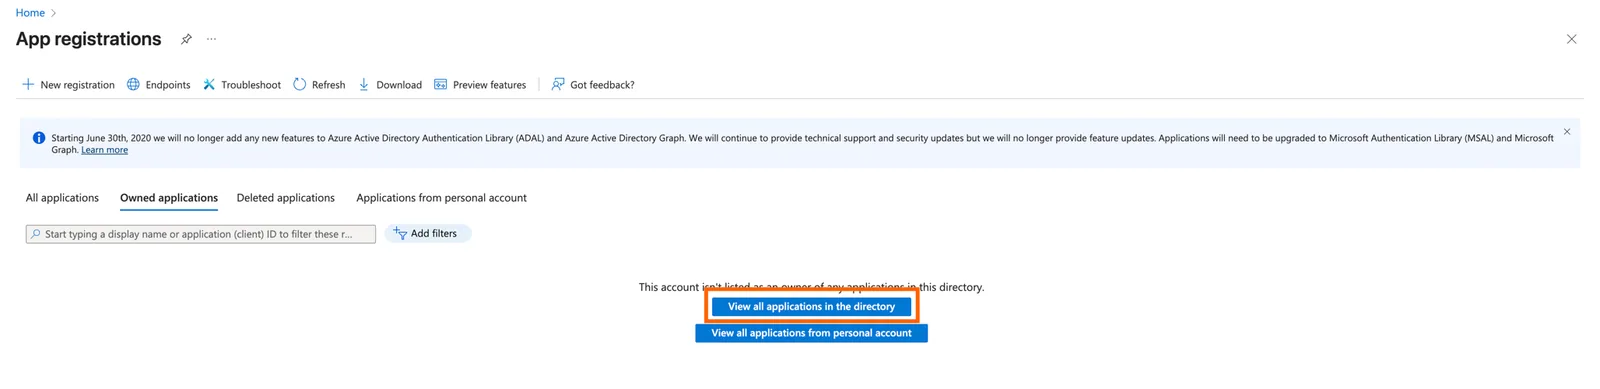
- In the Azure Portal search bar, type: "App registrations"
- Click App registrations
- Click the "View all applications in directory" button
- Find and click stacksync-example
Step 4.2: Create "viewer" Role
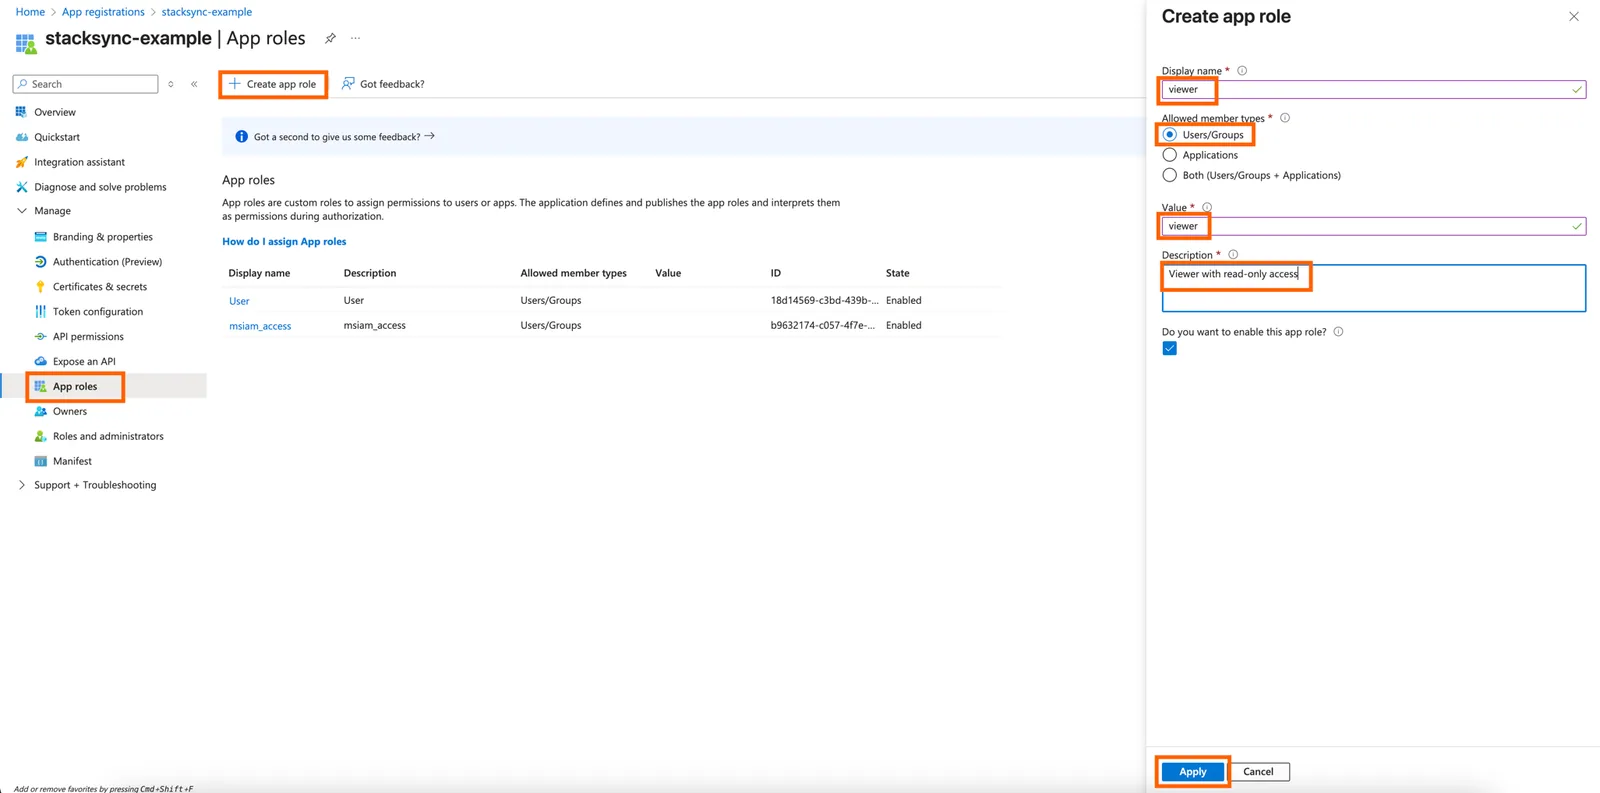
- In the left sidebar, click App roles
- Click + Create app role
Fill in:
- Display name:
viewer - Allowed member types: Users/Groups
- Value:
viewer - Description:
Viewer with read-only access - Do you want to enable this app role? ✅ Checked
- Click Apply
Step 4.3: Create "editor" Role
- Click + Create app role again
Fill in:
- Display name:
editor - Allowed member types: Users/Groups
- Value:
editor - Description:
Editor with standard access - Do you want to enable this app role? ✅ Checked
- Click Apply
Part 5: Configure Attribute Mappings
Step 5.1: Access Attribute Mappings
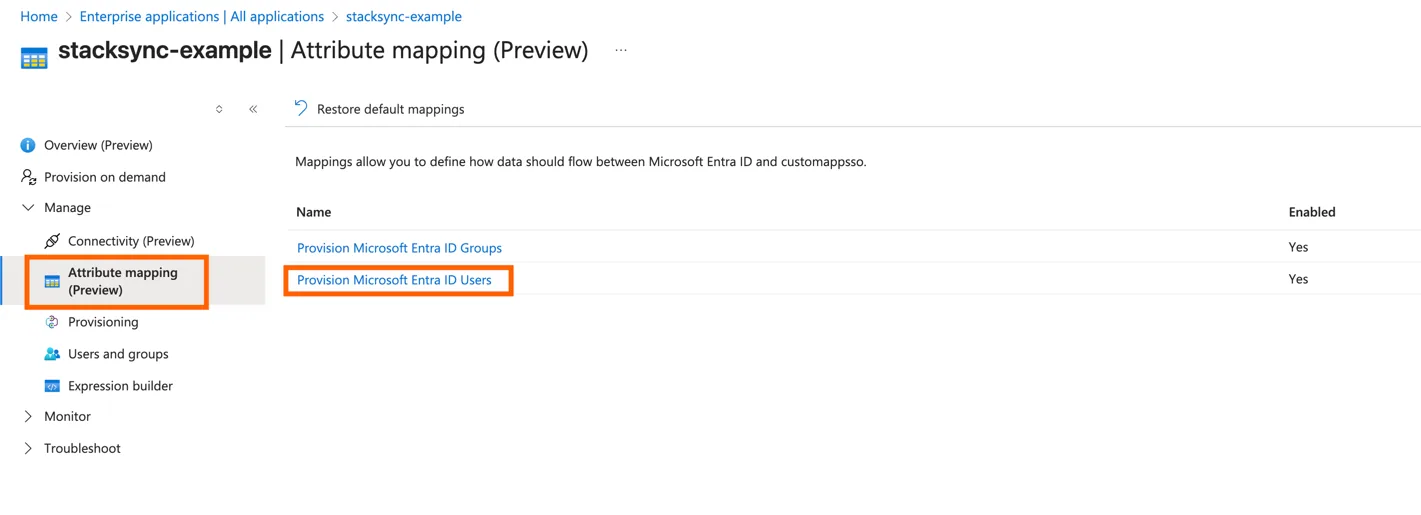
- Go back to Enterprise applications → stacksync-example
- Click Provisioning in the left sidebar
- Under Attribute Mappings, click Provision Microsoft Entra ID Users
Step 5.2: Add Roles Mapping
- Scroll to the bottom and click Add New Mapping
Fill in:
- Mapping type: Expression
- Expression:
SingleAppRoleAssignment([appRoleAssignments])- Target attribute:
roles[primary eq "True"].value - Default value if null:
viewer - Apply this mapping: Always
- Match objects using this attribute: No
- Click OK
- Click Save at the top
![Azure Edit Attribute with Expression SingleAppRoleAssignment([appRoleAssignments]), default "viewer", target roles[primary eq "True"].value.](/images/home/azure-roles-expression-attribute-mapping.webp)
Part 6: Start Provisioning
Step 6.1: Enable Provisioning
- Go back to the main Provisioning page (Preview)
- Click Start provisioning
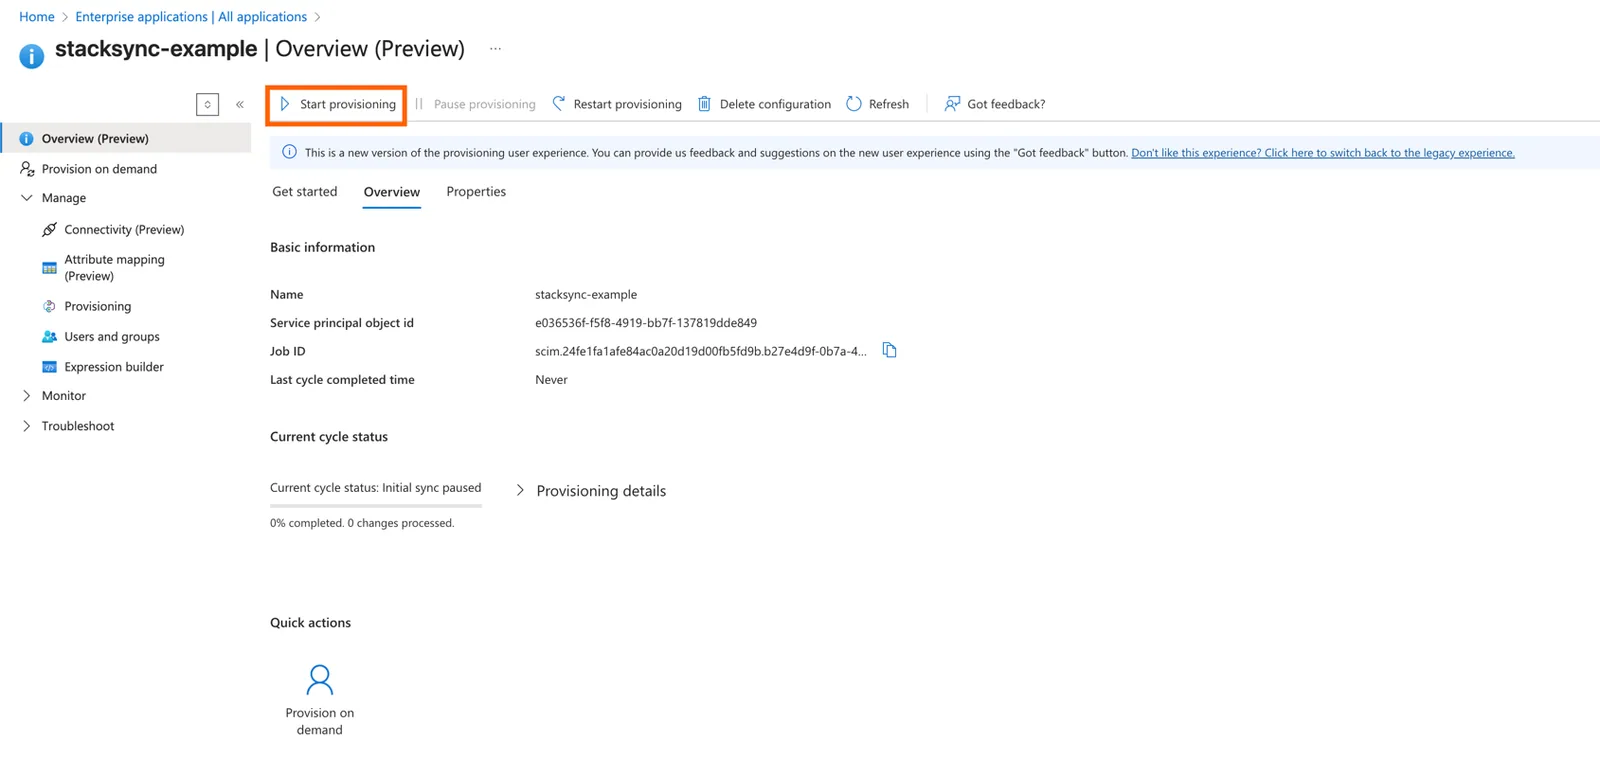
Azure will now start provisioning users. The initial sync takes 5–10 minutes.
Part 7: Assign Roles to Users
Step 7.1: Assign a Role to a User
- Go to Users and groups in the left sidebar
- Click + Add user/group
- Under Users, click None Selected
- Select a user
- Click Select
- Under Select a role, click None Selected
- Choose either viewer or editor
- Click Select
- Click Assign
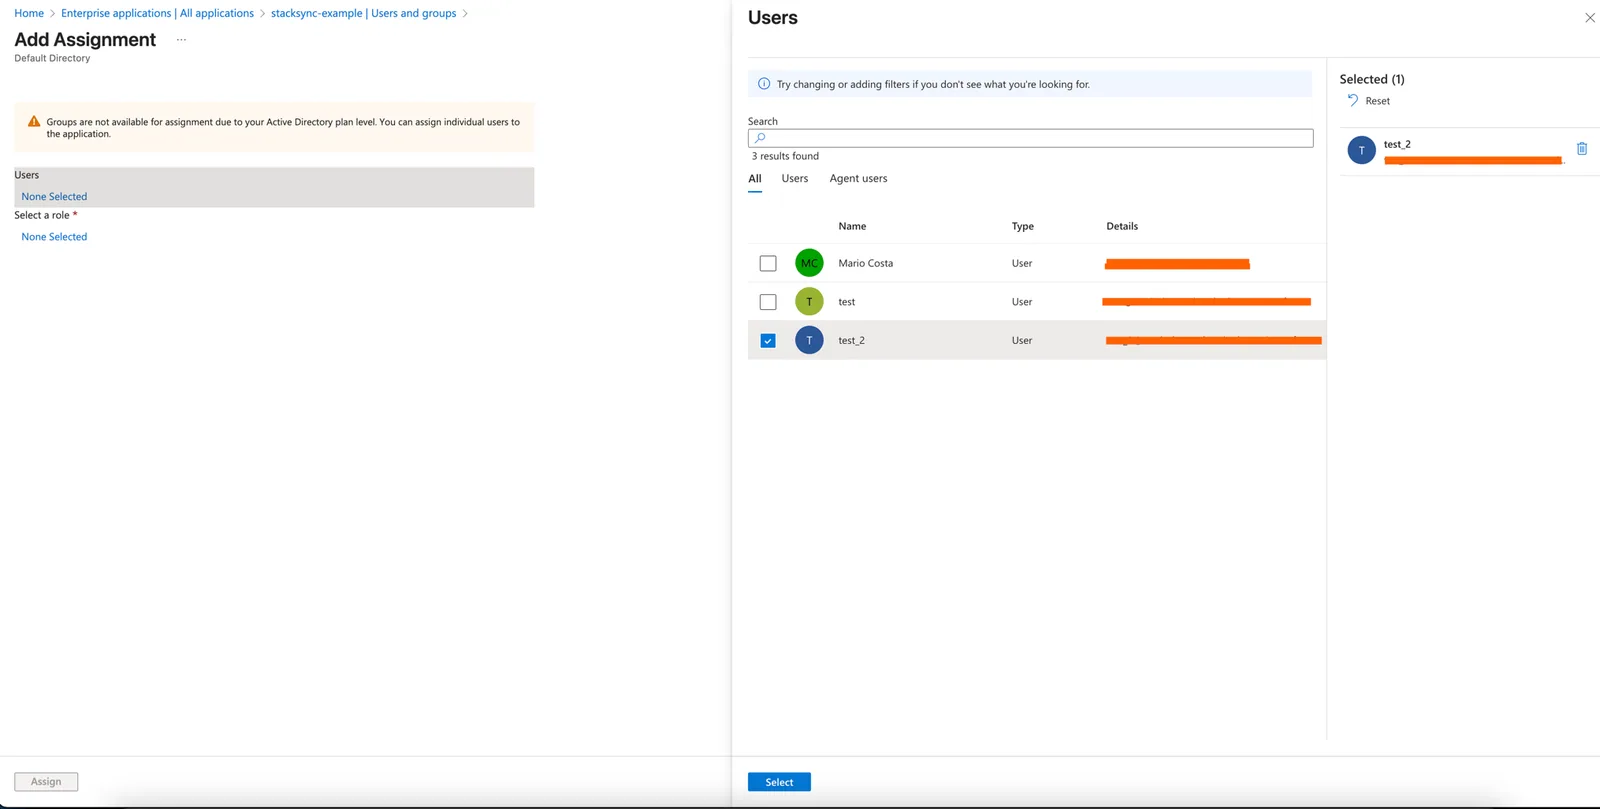
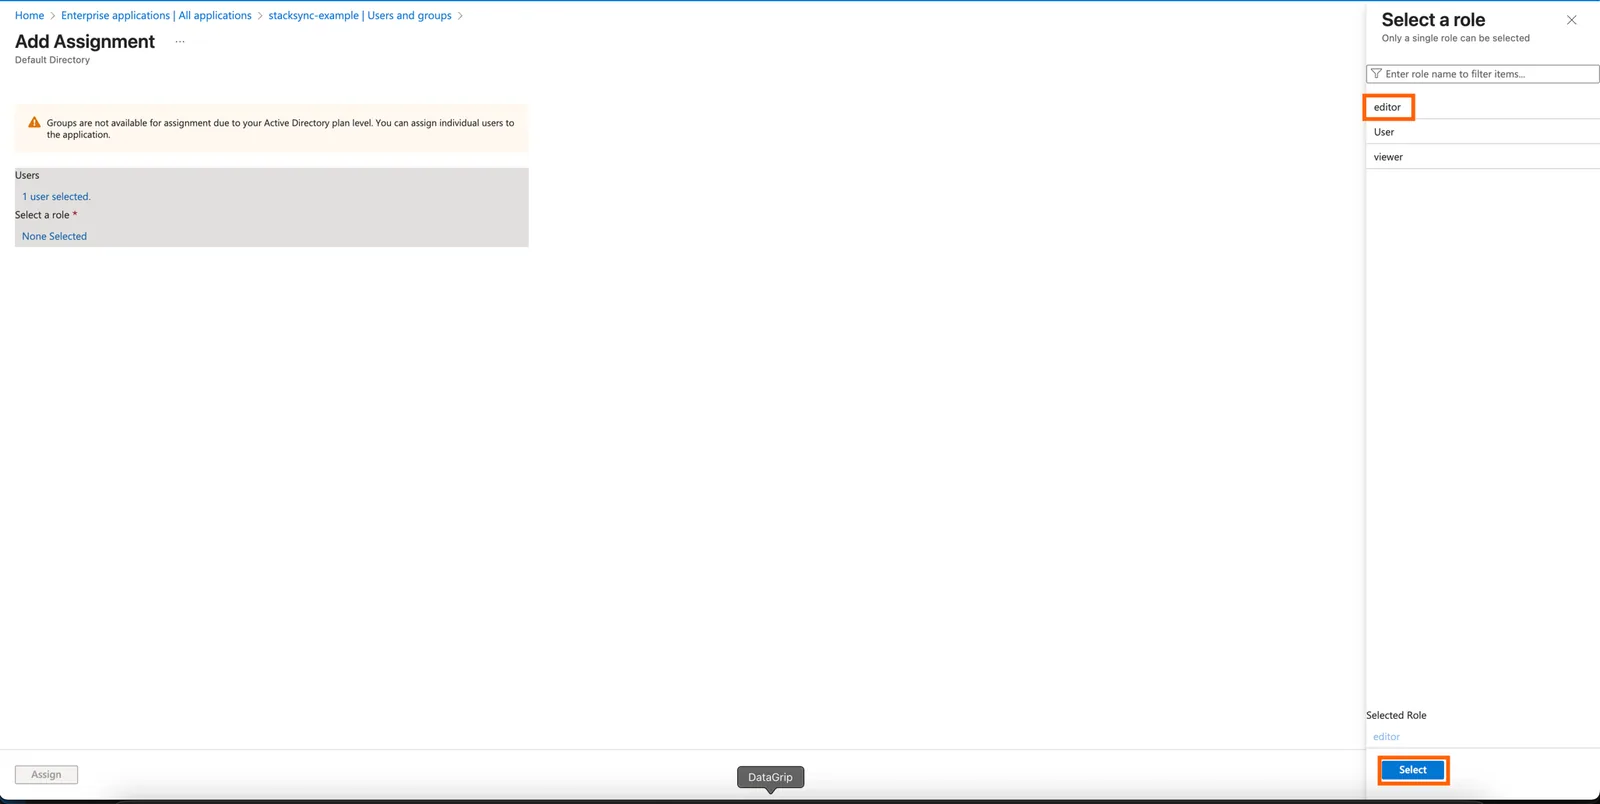
Repeat this for each user, assigning them the appropriate role.
Part 8: Test the Setup
Step 8.1: Test Provisioning
- Go to Provisioning → Provision on demand (if available)
- Select a test user (you'll need to search for the user)
- Click Provision
- Verify the user is successfully created in your Stacksync workspace
Troubleshooting
Users Not Provisioning
Check:
- Provisioning Status is On
- Users are assigned to the Stacksync application
- Users have a role assigned (viewer or editor)
- User has an email address
- Wait 10–40 minutes for the initial sync
View logs:
- Go to Provisioning → View provisioning logs
Wrong Role Assigned
Check:
- Role is assigned correctly in Users and groups
- Roles attribute mapping includes default value
viewer - App roles display names are lowercase:
viewer,editor(notViewer,Editor)