

OKTA Stacksync
SCIM setup instructions
This guide will walk you through setting up automatic user provisioning between Okta and Stacksync.
Overview
By the end of this guide, you will have:
- ✅ SAML-based Single Sign-On configured
- ✅ Automatic user provisioning via SCIM
- ✅ Role-based access control
- ✅ Users automatically created/updated/deactivated in Stacksync
Estimated time: 30–45 minutes
Prerequisites
Before you begin, ensure you have:
- Okta admin access
- Stacksync owner account
- Your company's email domain (e.g.,
acme.com) - List of users who should have access
Supported Features
The following SAML 2.0 features are supported:
| Feature | Supported |
|---|---|
| SP-initiated SSO | Yes |
| IdP-initiated SSO | Yes |
| Just-In-Time (JIT) Provisioning | Yes |
| Single Logout (SLO) | No |
SCIM Provisioning Features
The following SCIM 2.0 provisioning features are supported:
| Feature | Supported |
|---|---|
| Push New Users | Yes |
| Push Profile Updates | Yes |
| Push User Deactivation | Yes |
| Reactivate Users | Yes |
| Push Groups | No |
| Import Users | No |
| Import Groups | No |
| Sync Password | No |
SCIM Attributes
The following user attributes are supported for SCIM provisioning operations:
| Attribute | Required | Immutable | Description |
|---|---|---|---|
| userName | Yes | No | User's unique identifier (typically email) |
| Yes | Yes | User's email address (cannot be changed via SCIM) | |
| givenName | No | No | User's first name |
| familyName | No | No | User's last name |
| roles | Yes | No | User's role: viewer or editor |
Note: The
Additional Features
| Feature | Supported |
|---|---|
| Force Authentication | No |
| Encrypted Assertions | No |
| Signed Requests | Yes |
Notes
- SP-initiated SSO: Users can initiate login from the Stacksync login page by entering their email address. They will be redirected to Okta for authentication.
- IdP-initiated SSO: Users can initiate login directly from their Okta dashboard by clicking the Stacksync app tile.
- SCIM Provisioning: Automatic user lifecycle management including creation, updates, and deactivation. Each workspace requires a separate SCIM app configuration.
- Role-Based Access Control: Users can be assigned
vieweroreditorroles through Okta group membership.
Important Notes
- You will create one "Stacksync - SSO" app for your entire organization
- You will create one "Stacksync - SCIM" app per workspace
- If you have multiple workspaces (e.g., dev, staging, production), you must set up a separate SCIM app for each
- Each workspace has independent RBAC enforcement
Part 1: Configure SAML Single Sign-On
The SSO configuration connects your Okta organization to Stacksync. You only need to complete this once for your entire organization.
Step 1.1: Add the Stacksync SSO App
- Sign in to your Okta Admin Console
- Navigate to Applications → Applications
- Click Browse App Catalog
- Search for and select Stacksync - SSO
- Click Add Integration
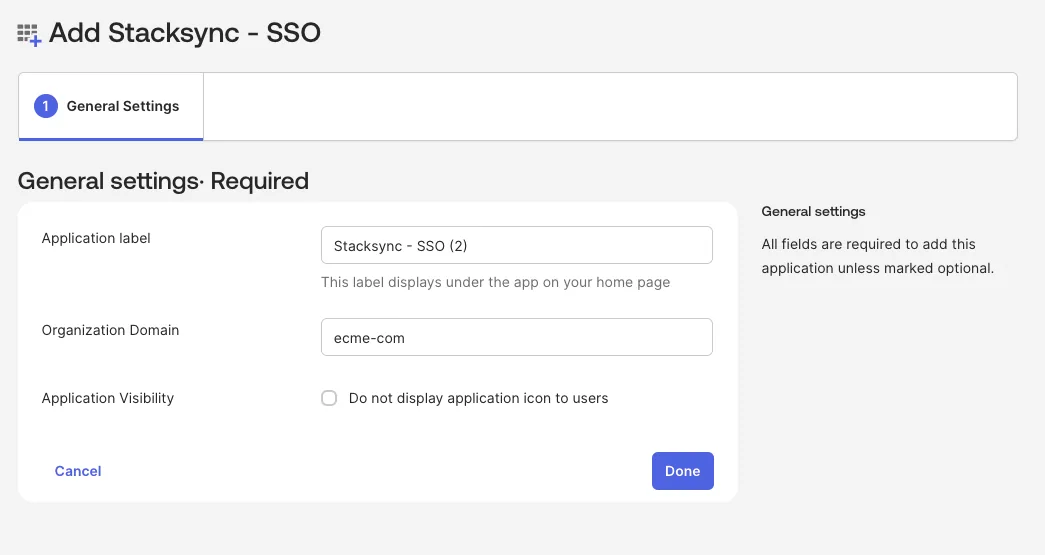
Step 1.2: Configure Application Settings
- In the application setup form, enter:
- Organization Domain: Your company domain with dashes instead of dots (e.g.,
acme-comforacme.com)
- Organization Domain: Your company domain with dashes instead of dots (e.g.,
- Click Done
Step 1.3: Retrieve SAML Configuration URLs
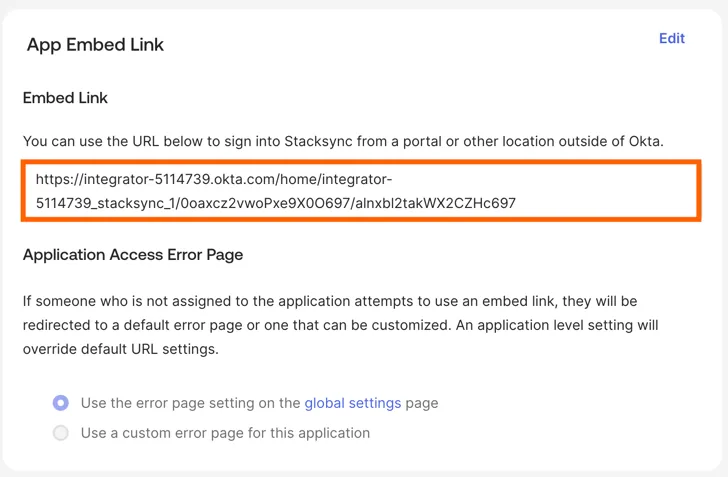
- Navigate to the General tab
- Scroll down to App Embed Link
- Copy and save the embed link
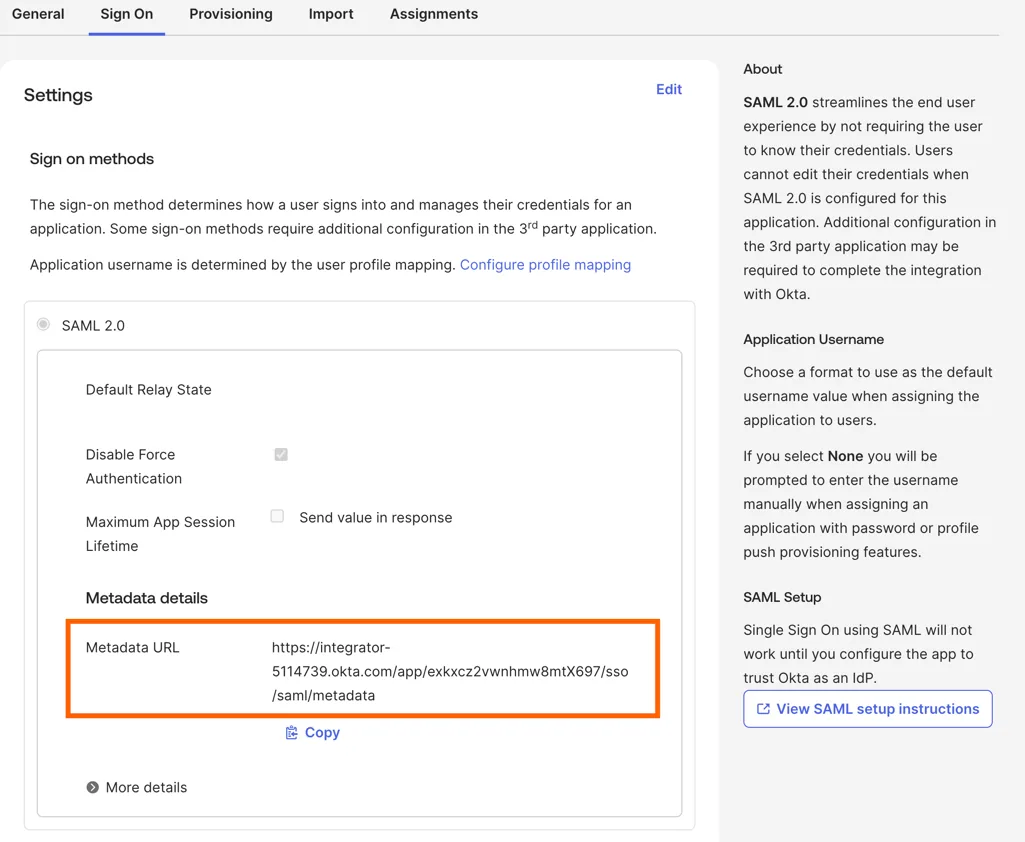
- Navigate to the Sign On tab
- Copy and save the Metadata URL
Step 1.4: Configure SSO in Stacksync
Note: The SSO configuration should only be done once per company domain. All workspaces will share the same SSO configuration.
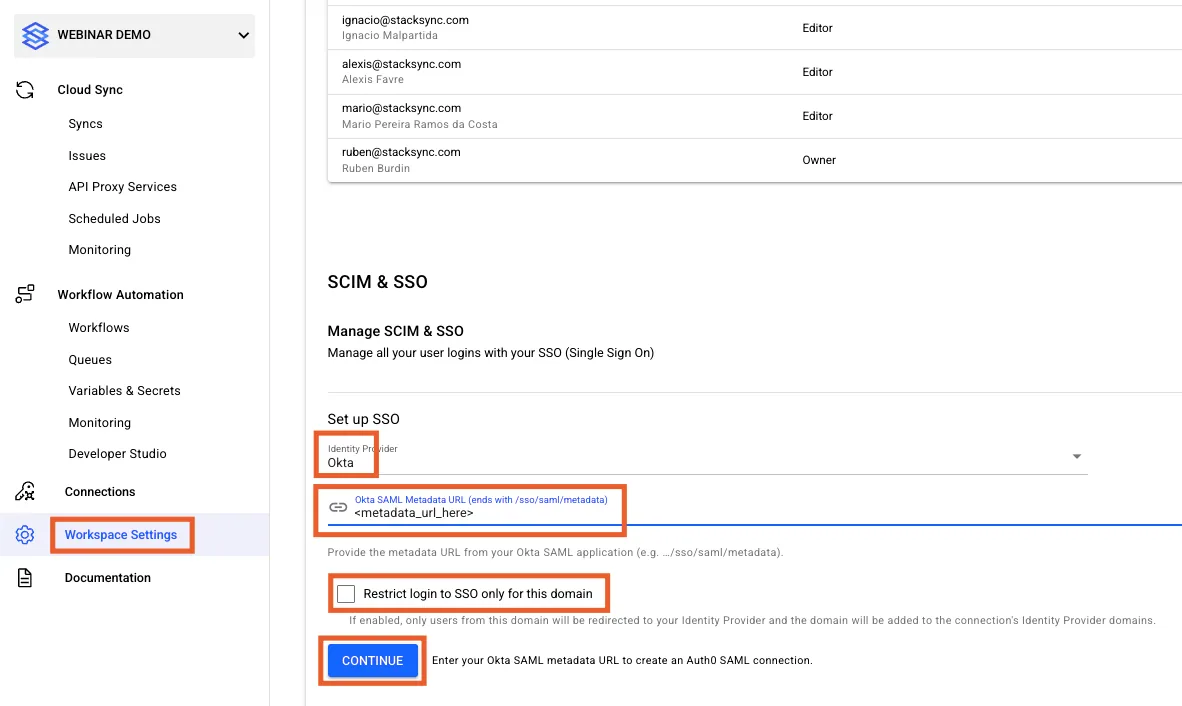
- Navigate to your Stacksync workspace settings
- Select Okta as your identity provider
- Upload the SAML metadata or enter the metadata URL from Step 1.3
- (Optional) Enable Restrict login to SSO only for this domain to require SSO authentication for all users with your domain
- Click Continue
You should now see a confirmation page with all the necessary information to complete the setup.
Part 2: Set Up Automatic User Provisioning (SCIM)
The SCIM configuration enables automatic user provisioning. You must complete this for each Stacksync workspace.
Step 2.1: Add the Stacksync SCIM App
- In your Okta Admin Console, navigate to Applications → Applications
- Click Browse App Catalog
- Search for and select Stacksync - SCIM
- Click Add Integration
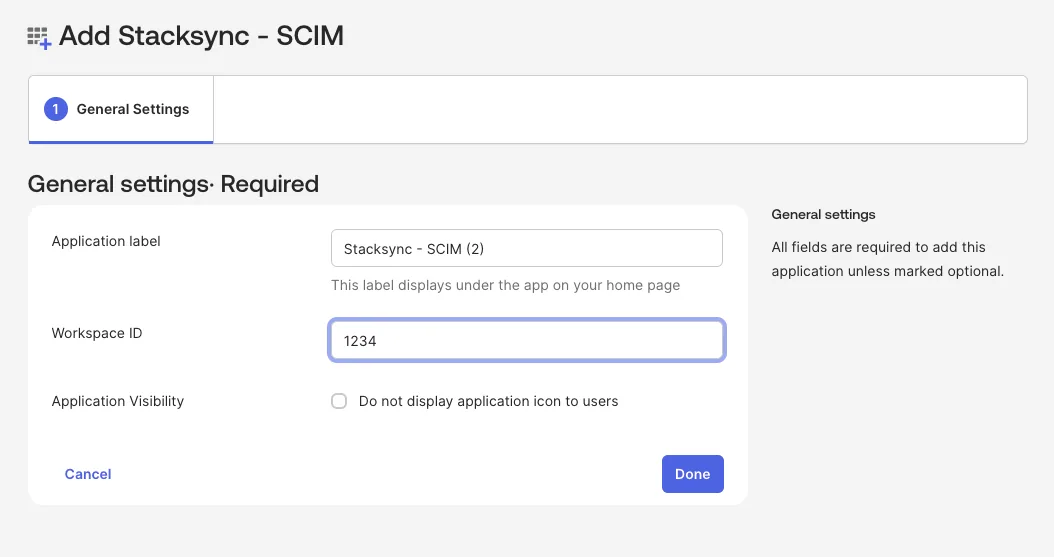
- Enter your Workspace ID when prompted
- Click Done
Step 2.2: Generate a Workspace API Key
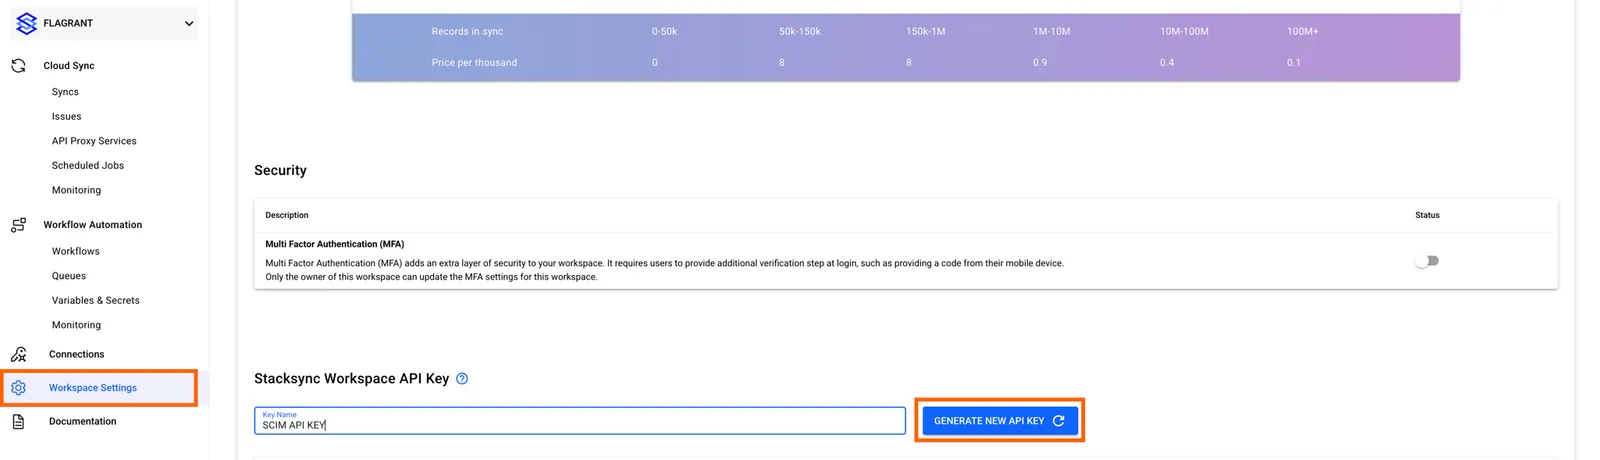
- Navigate to your Stacksync workspace settings
- Scroll down to Stacksync Workspace API Key
- Click Create API Key
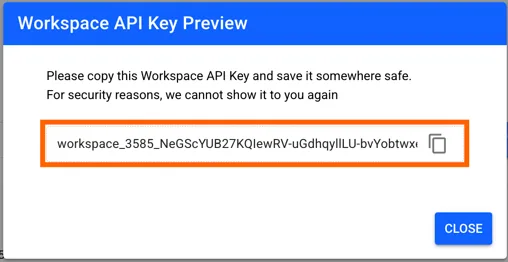
- Save the generated API key securely
Step 2.3: Enable API Integration
- Return to your Okta Admin Console
- Open the Stacksync SCIM application you created
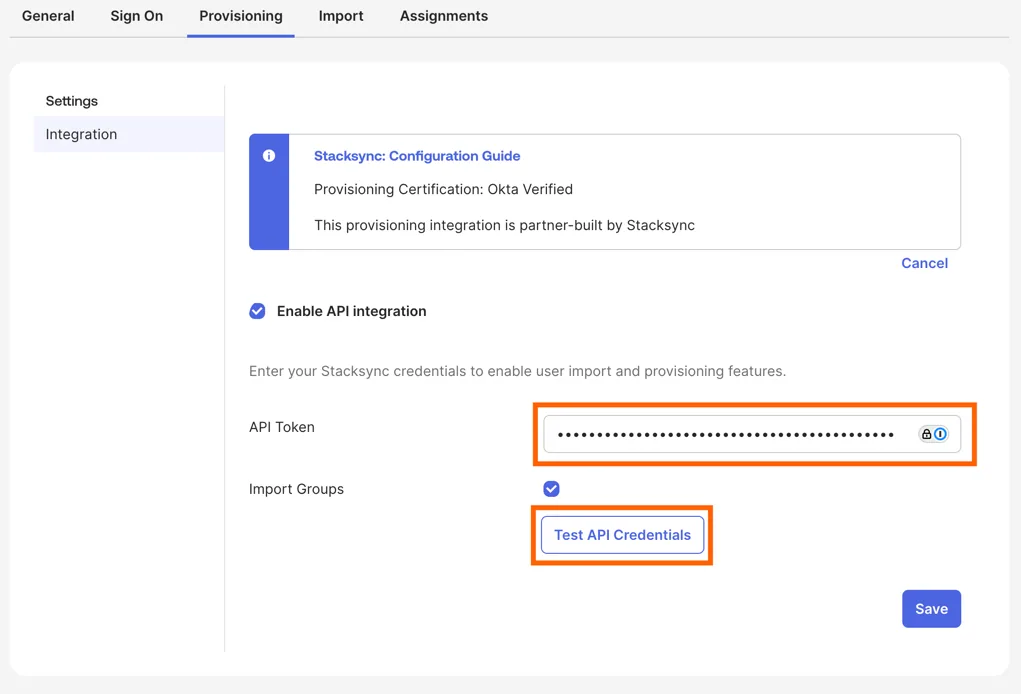
- Navigate to the Provisioning tab
- Click Configure API Integration
- Check Enable API Integration
- Paste your API key from Step 2.2
- Click Test API Credentials
- Verify that you see a success message
- Click Save
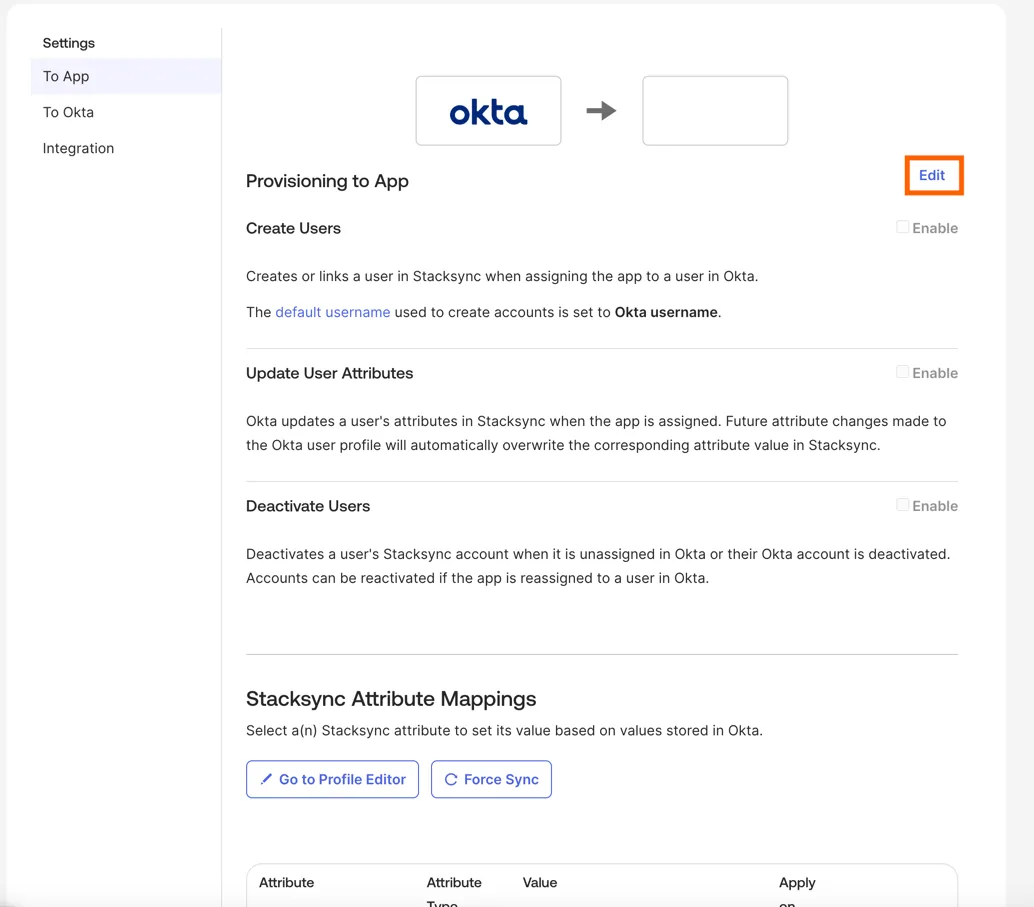
Step 2.4: Configure Provisioning Settings
- After saving, the page will display additional options
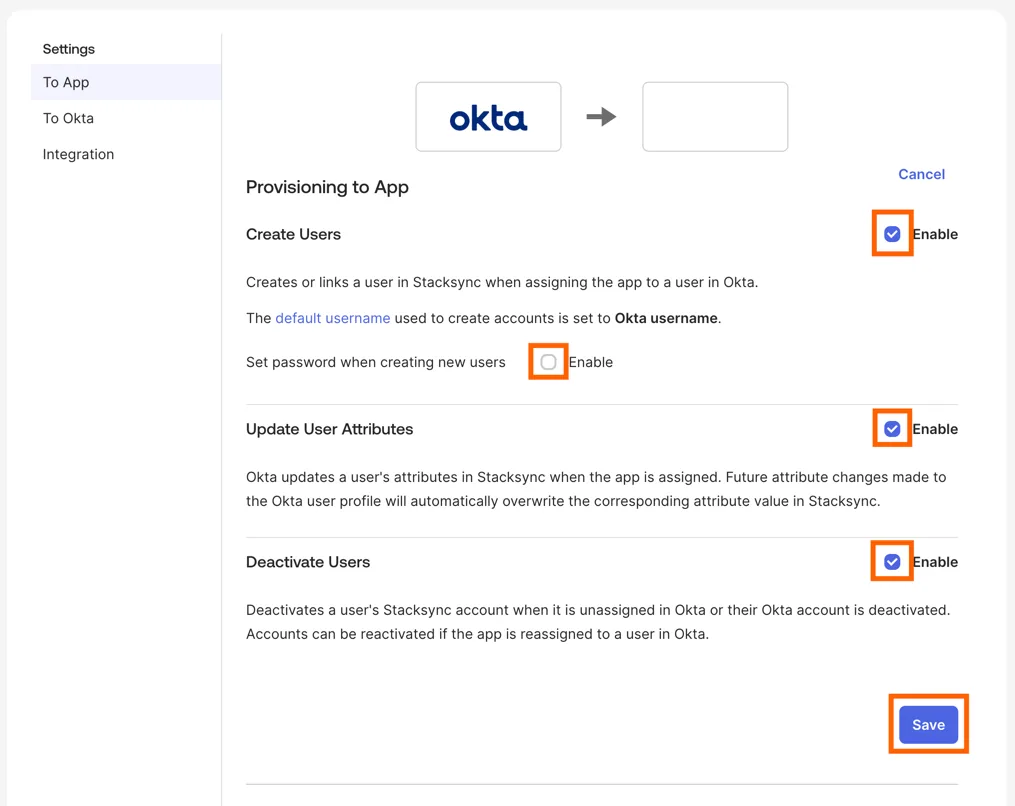
- Click Edit in the To App section
- Enable the following options:
- Create Users
- Update User Attributes
- Deactivate Users
- Disable Set password when creating new users
- Click Save
Part 3: Configure Role Attribute Mappings
App roles define which permission level users have in Stacksync (viewer or editor).
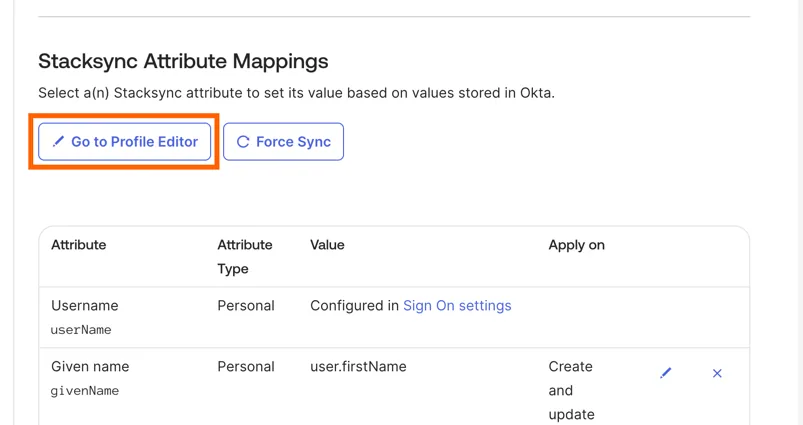
Step 3.1: Access the Profile Editor
- In the Provisioning tab, scroll down to Attribute Mappings
- Click Go to Profile Editor
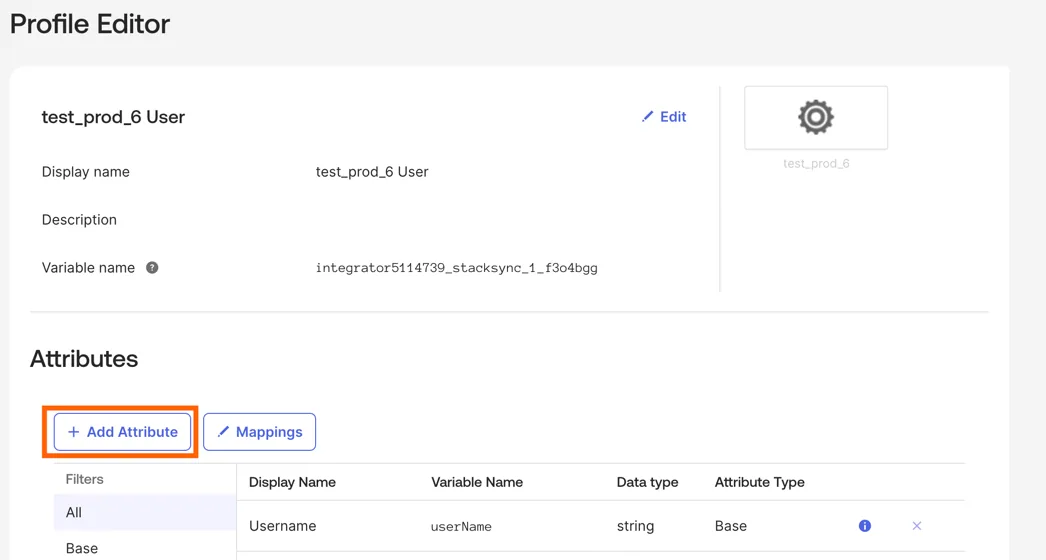
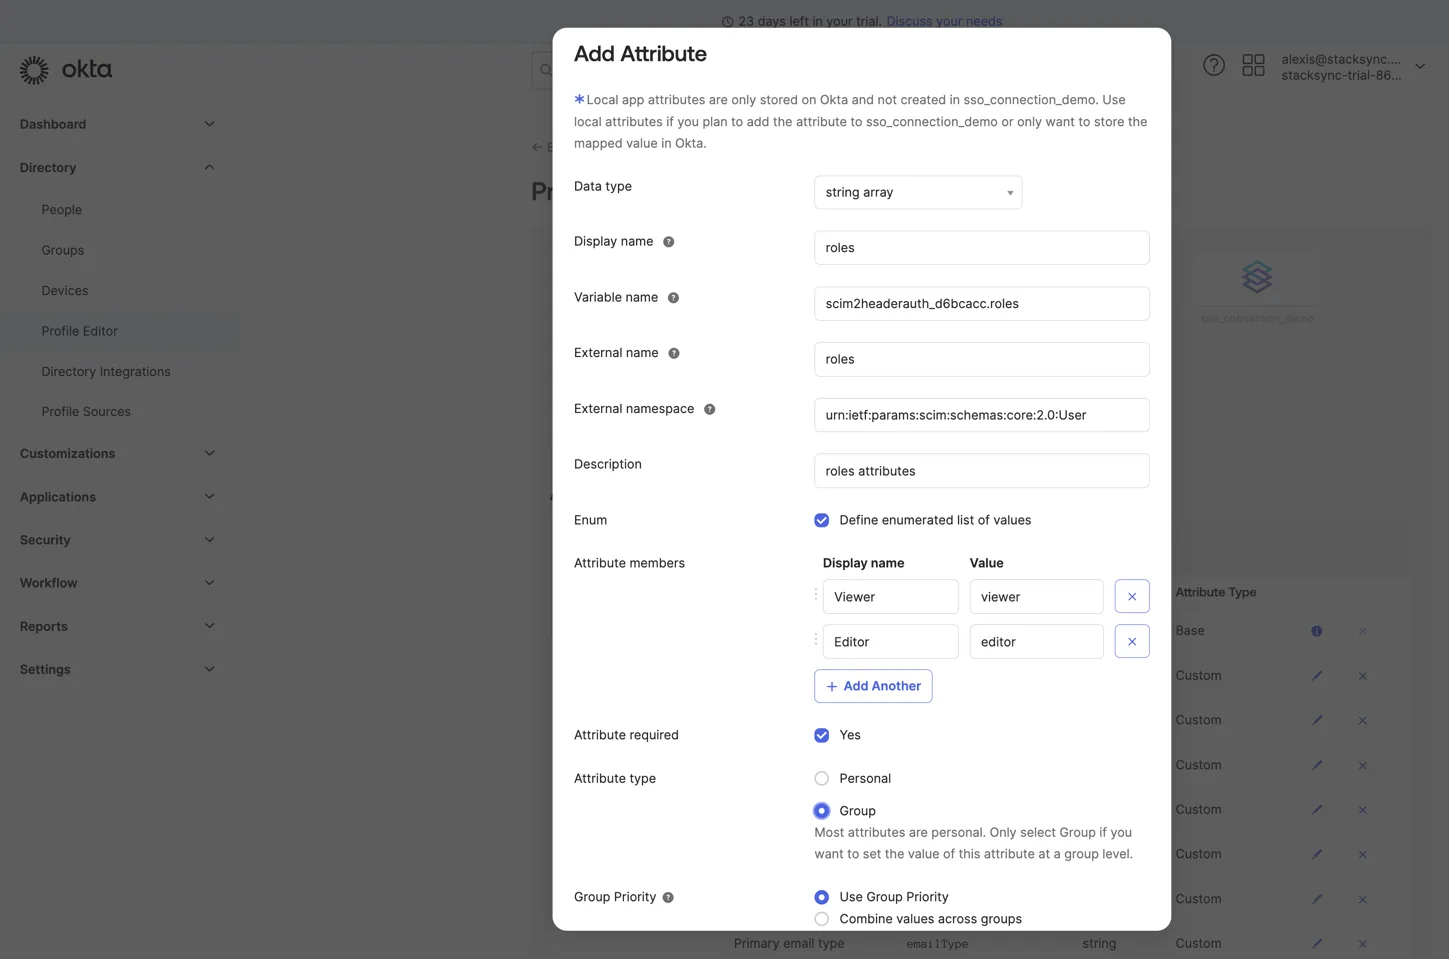
Step 3.2: Add the Roles Attribute
- Click + Add Attribute
- Fill in the following fields:
- Data type: string array
- Display name: roles
- Variable name: roles
- External name: roles
- External namespace:
urn:ietf:params:scim:schemas:core:2.0:User - Description: SCIM role attribute for Stacksync app
- Enum: Enabled
- Attribute members:
viewer,editor - Attribute required: Yes
- Attribute type: Group
- Group Priority: Use Group Priority
- Click Save
Step 3.3: Configure Role Mapping Expression
-
Return to your SCIM application
-
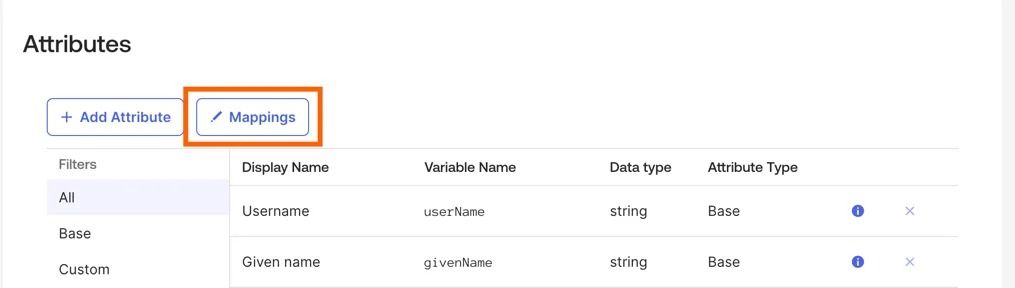
Under Attributes, click Mappings
-
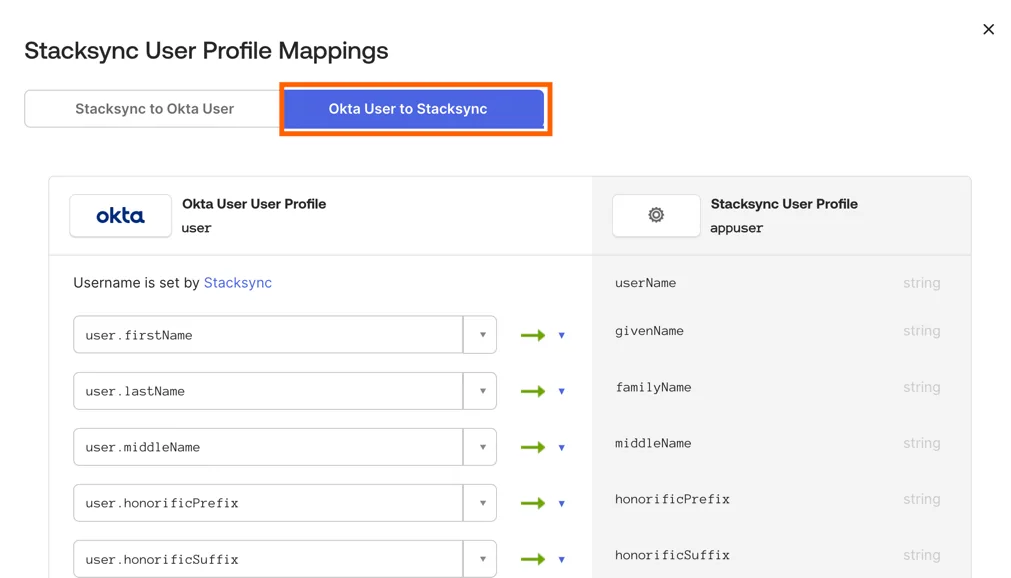
Switch to the Okta User to Stacksync tab
-
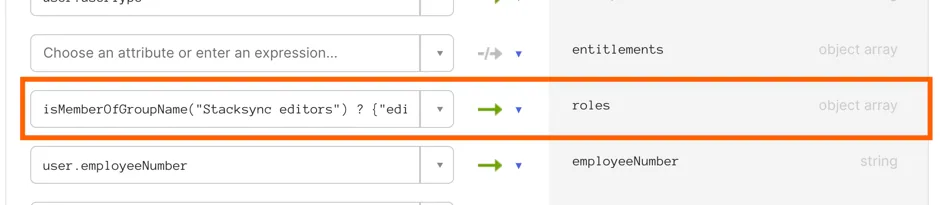
Find the roles attribute in the mapping list
-
Add the following expression:
isMemberOfGroupName("Stacksync editors") ? {"editor"} : {"viewer"} -
Click Save
Part 4: Create Groups and Assign Users
Step 4.1: Create Stacksync Groups
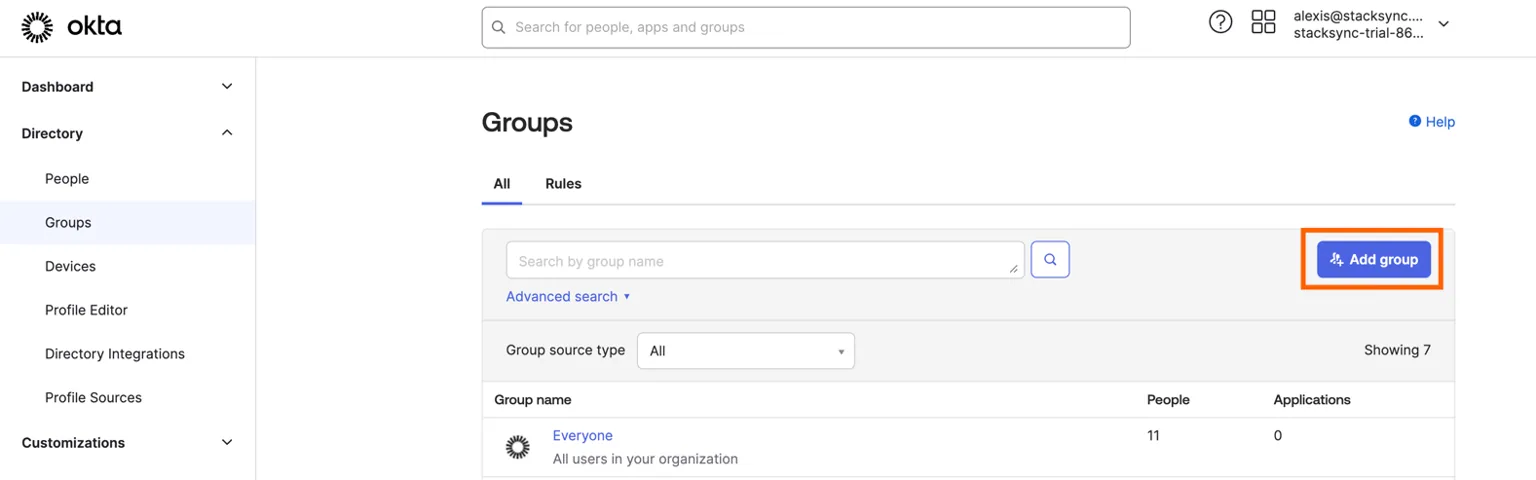
- Navigate to Directory → Groups
- Click Add Group
- Create two groups:
- Stacksync Editors — Users with editor permissions
- Stacksync Viewers — Users with read-only permissions
Step 4.2: Add Users to Groups
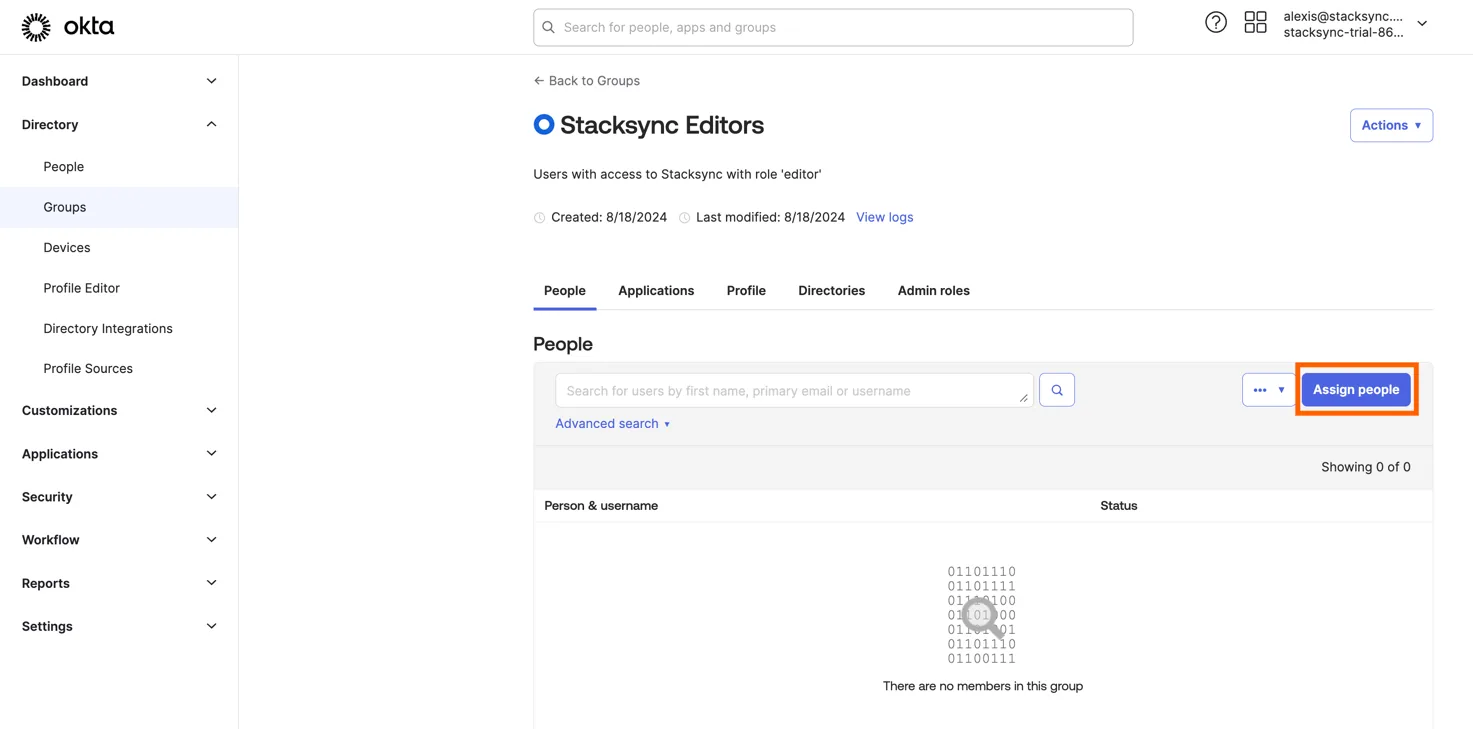
- Open each group you created
- Click Assign People
- Select the users who should have that access level
- Click Save
Step 4.3: Assign Groups to the Application
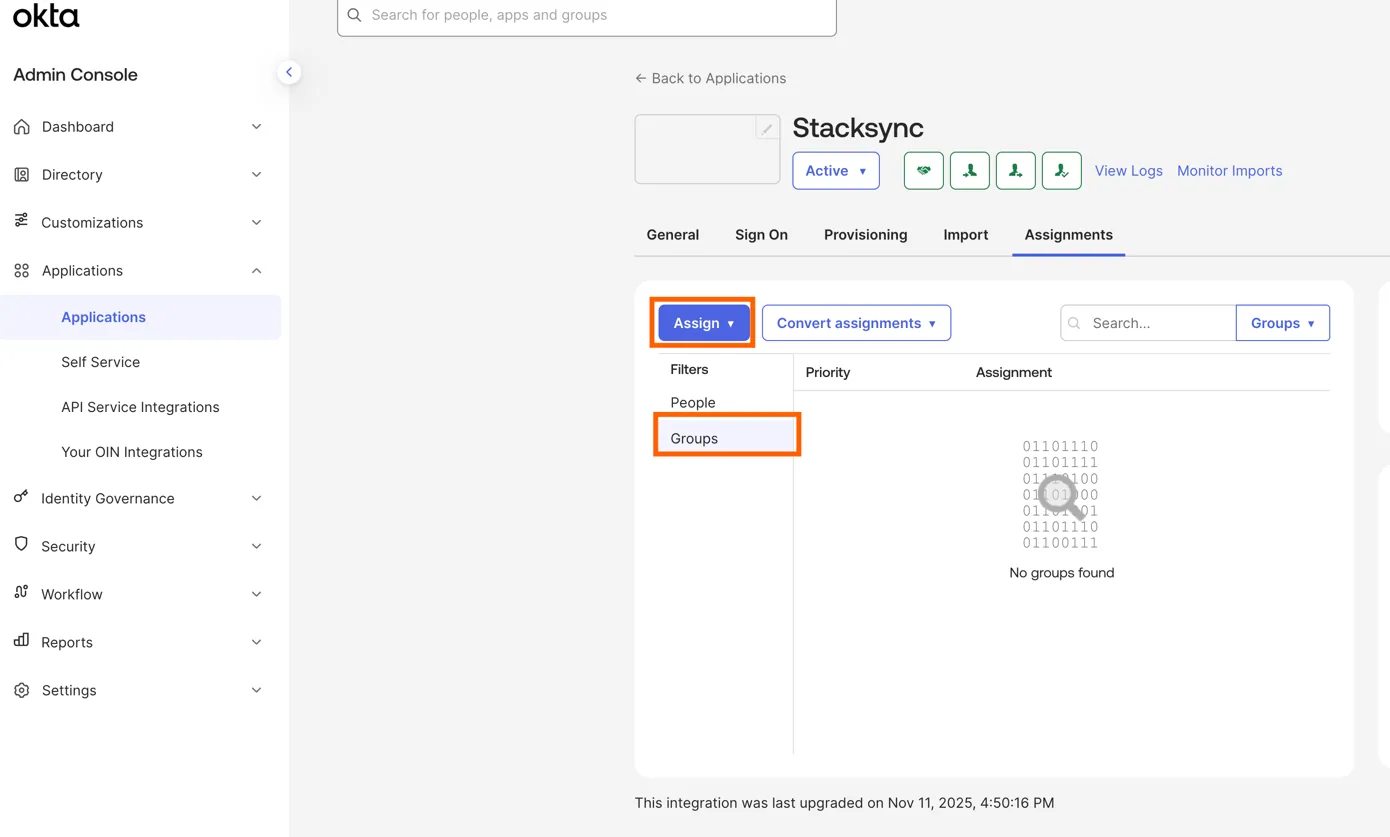
- Return to your Stacksync SCIM application
- Navigate to the Assignments tab
- Click Assign → Assign to Groups
- Select Stacksync Editors
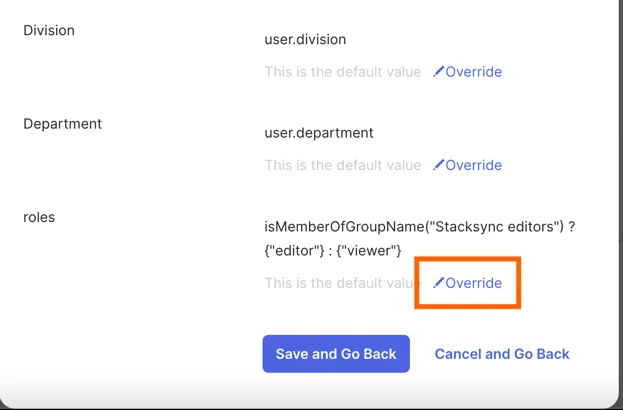
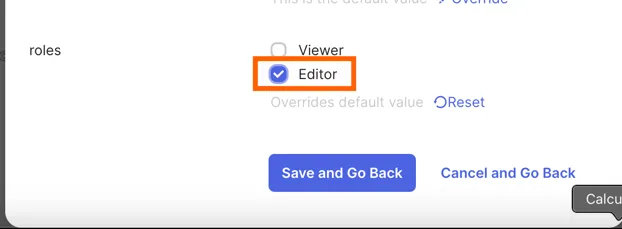
- In the assignment dialog, set the roles field to
editorby clicking the override text and choosing the radio buttoneditor - Click Save and Go Back
- Repeat for Stacksync Viewers, setting the roles field to
viewer - Click Done
That's it! 🎉
Troubleshooting
Common Issues
User not provisioned to Stacksync
- Verify the API key is correct in the Provisioning settings
- Check that the user is assigned to the Stacksync SCIM application
- Ensure the user has a valid role assigned (viewer or editor)
Role not updating
- Verify the role mapping expression is correct
- Check that the user is in the correct Okta group (Stacksync Editors or Stacksync Viewers)
- Try removing and re-adding the user to the group
SSO login fails
- Verify the Metadata URL is correct in Stacksync settings
- Check that the user's email domain matches the configured SSO domain
- Ensure the user is assigned to the Stacksync SSO application
API credentials test fails
- Verify the Workspace ID is correct
- Regenerate the API key in Stacksync workspace settings
- Ensure you're using the correct workspace
Support
For additional assistance, contact Stacksync support at support@stacksync.com